Showing posts with label technique. Show all posts

Sunday, 9 September 2018

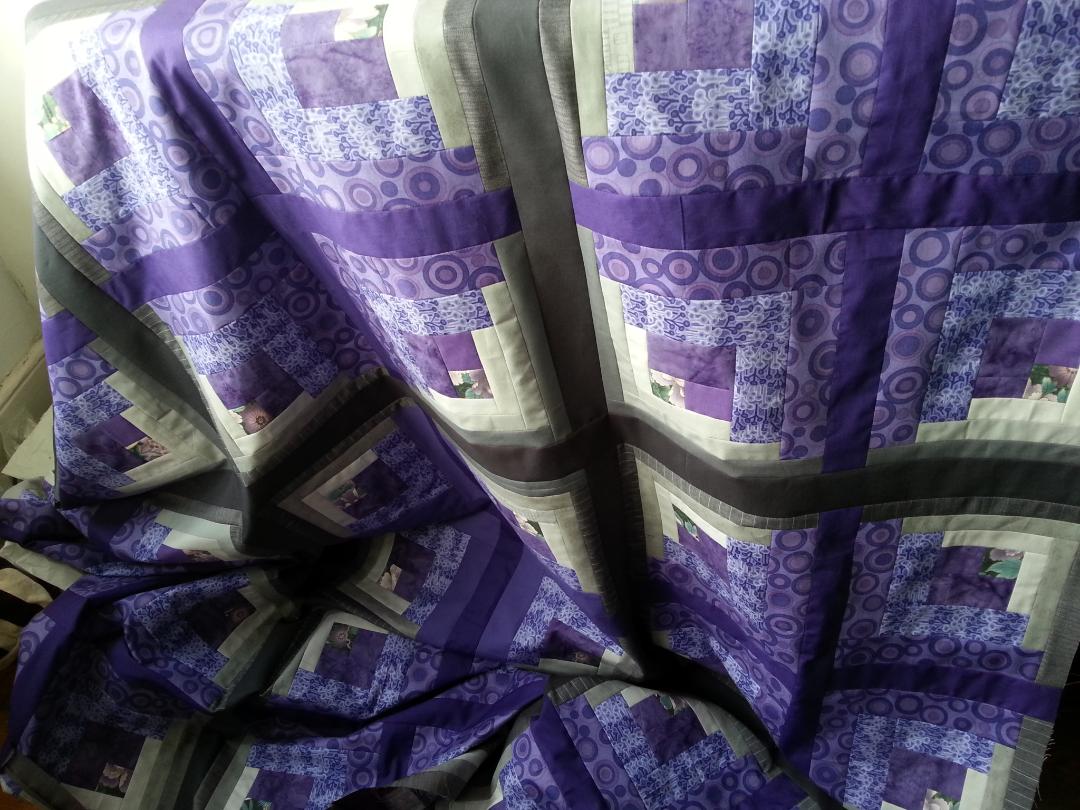
Purple and grey quilt top!

Twelve squares sewn together!

I made one of these months ago, just to see what the log cabin pattern is like when you cut one colour group in two inch strips and the other in an inch and a quarter.

I knew this would produce an uneven distribution and that the main colour would form sort of circles, but I didn't quite appreciate that they really do?! Odd, right? It was fun to see it all take shape.

I was going to do a cushion cover with this square but had so much purple fabrics that I was very keen to use up. I'm amazed that I managed to do all eleven squares! This massive amount of sewing usually takes me lots longer.

Two of these fabrics are called Pansy by Fabric Freedom (I think it was the circle one?) and another was called Victoria, also by Fabric Freedom. I bought them separately but it's no wonder that I put the two together. The small pattern was a cotton fabric from a normal fabric shop. I don't recall where I got the batik fabric.

The grey fabrics are all Kona. Years ago I bought every single grey Kona I could find so I would know what they are like... with the logical result that there are some that I don't like very much. These are them. Except for the charcoal. I like that one a lot.


I thought the purple 'circles' would dominate and sort of pop out more than the grey crosses, - I may have chosen a slightly too dark colour for the darkest grey. This is Charcoal of the Kona Solid range (from Annie's Village Haberdasher in West Hampstead. I was very glad to be able to pick out a colour in person that went with all the others). On the other hand a lighter grey would have disappeared into the neighbouring stripes...

I'll need to figure out what to do with the free motion quilting to lift out the purple areas. It will be my first time free-motioning - I'm actually rather nervous about that.


I ended up using all sorts of odd grey fabrics for the outer stripe in the quarter squares - I totally ran out of the original fat quarter. I cut up remnants of wool fabric that I had made trousers from, and even a grey shirt with a pin stripe, both of which were roughly an okay weight and their colour fit well.

I fussy-cut the center squares: the heart of the log cabin. I know these are traditionally made from a red fabric because they signify the hearth fire of the log cabin but I didn't want to use red with these colours. Not even a brown or rusty colour.

I picked a fat quarter that had purple elements. I didn't at first appreciate how much of the background green would appear in these squares but I ended up really liking that accidental contribution to the quilt.

It adds a little something without overwhelming the other elements.

I already have the wadding (in fact I bought it a good 4-5 years ago. I'm so glad to use it), now I "just" need to spread it out, sling the patchwork top on it... and err... pin it I guess?  Not forgetting the backing fabric (which is also sitting in my stash).  I haven't looked at that one yet.

But I need to spread the quilt top out so I can see if is big enough.

Hey-ho!

Sunday, 13 September 2015

A pattern for knit or woven fabric?

Is a pattern described as 'for knit/stretch fabrics' correctly marked, or is this a mistake?

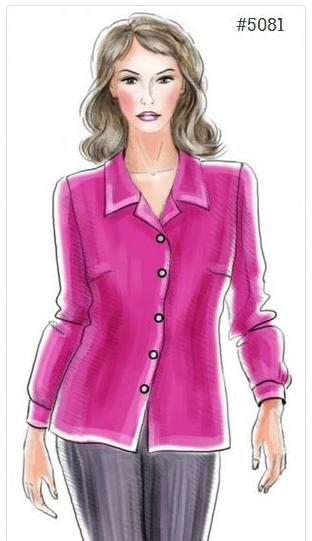
This Lekala design is marked as "Fabrics: Knit. Is stretchy: yes":


Design 5081 is a long-sleeved blouse with bust darts, plackets and a button band.  I have never seen a knit/jersey/stretch fabric pattern with all these features.  Patterns for knit fabrics usually take advantage of the fabric being stretchy whereas patterns for woven fabric cannot: woven styles need openings along the front as well as in the sleeves, they need shaping in the bust area - knit patterns also don't feature completely flat pieces (the front and back of this blouse) but often include some kind of draping which woven fabric does not do well.

I must say that when I first saw this pattern I just assumed it was for woven fabrics. Assuming is always a big mistake, in dressmaking as much as in other contexts!  I cut out a polycotton fabric and started sewing.  It was by chance that I looked at the pattern again and finally saw the 'knit' reference. Oops. But really?

The website lists this pattern 5081 when you filter on 'woven' - so that seems to point to the knit description being wrong.

For these reasons I think that this pattern was marked incorrectly but I can't be sure.  What do you think?

~ ~ ~

I would perhaps not have noticed the 'knit' claim if it hadn't been for the sleeves:


When I sewed the sleeveheads in I just couldn't make them lie flat - the curved seam around the top of the shoulder is all puckered and distorted even though I applied the normal technique: two rows of gathering and distributing the fullness of the sleeve material very carefully by pinning every centimeter.  No joy.

I also found an issue with the shoulder width that is down to me.  I used some of the Advanced features that allow you to customise your pattern beyond the standard measurements of height, bust, waist, hips etc - unfortunately I didn't realise that my shoulders are a bit narrower compared to their measure.

You can just about see how the shoulders dip down at the seam to the sleeves in these two photos:


So I will rip the sleeves back out and cut the shoulders a bit narrower. Only by 5-12mm or so.  That should take care of the sleeveheads being slightly too big and make sewing them back in a lot easier.

At least I hope so. Fingers crossed.

I am also wondering if I marked the correct centre front because these pieces barely overlap - or do I need to do a FBA?  That would be weird seeing as this is a personalised pattern.

The advantage to turning the sleeves into flat pieces again is that I can correct something I forgot to do:  I didn't sew the plackets on when I should have (what a mental lapse) - it'll be good to do that first!  Silver lining...

Tuesday, 21 April 2015

One blind hem coming up!

I did it! 

I sat down and re-did the hem of this stash-busting skirt.  As a hand-stitched blind hem.

How do you like them apples?


It didn't take me very long at all - just a little time at a crafts meeting on Sunday afternoon.  You sit and chat while you stitch away at something like this... and almost without realising: you're getting it done.

To be completely honest: I can't quite believe that I was able to do this within a day of completing the rest of the skirt. And blogging about it.

The thing was that I still had this skirt (and its ugly hem) on my mind after getting so far with it, finally, but not in a way that I was particularly happy with.

I forgot that I basted the top edge by machine (for guidance) and didn't realise why this area was looking so ugly.  But once I had taken this stitching out - the whole skirt started to look quite good to me all of a sudden.  A nice surprise.

But I didn't like the machine stitched hem that I did in a sudden flurry of annoyed thinking: 'oh I'll just get this fardling stupid hem done quickly' - and it showed.

It looked out of place: the stitch length was too long and the colour a bit off.  It made the skirt look cheaper.  This is much better.  Not perfect by any means, but lots better.


And overall I am now much happier with the general standard of sewing on this project.  I feel like I am improving in technical skills and generally getting better at this sewing business.  It feels really good.

I was going to use my blind hem foot on my machine but knew that the hem was uneven on the inside.  I just didn't fancy trying to sew this with the foot and failing.  I do believe that doing this by hem was quicker and much less frustrating than the other way would have been.

I am not sure if I will do the tab at the top of the zip - I think it looks alright as it is: the opening makes a bit of a V-shape and I like the look of it.  I can change my mind later if I reconsider.

Overall I am much more happy with this skirt now than I was for quite a while.  I didn't make much progress for a long time and I am guessing that it was because I started to dislike the skirt.  Things don't half drag out if you don't feel like them.

But now it's done and I am pretty happy with it.

Monday, 9 March 2015

Coarse woven tweed skirt

I actually think of this skirt as my crazy fraying fabric skirt, I had such a hard time when I cut into this fabric: as soon as you do all the newly cut thread ends loosen and the fabric edge becomes distorted.

It is pretty much impossible to sew with non-existing edges like that.


In order to get around that I hacked out the pattern pieces in big chunks, then basted along the cutting line to mark it - and then, here's the piece de la resistance!, - then I put it through the overlocker: overlocking and cutting in one go. It worked great!

You only have to beware corners.  Because the overlocker knife cuts ahead and you can't turn a corner that hasn't been cut yet - the only way you could get around that is to run the overlocker off your rough fabric piece and start new.  But failing that: just cut an inch or so into the cutting line past the corner as you approach it with the overlocker, then you can easily turn at the corner, line up the knife with the already cut bit and go!


I think I matched the pattern pretty well across the centre back seam  and the side seams too. 

The fabric was £1 a metre from a Walthamstow fabric shop bordering the market. I liked the look of the fabric and could not resist buying it.  Bargain!

Unfortunately I forgot that I would have to spend time sewing something out of this fabric and I didn't really think whether I wanted a skirt like this.  I am not sure that it is me.

This was a bit aspirational - as in: this would look good on a elegant lady with a cute and very expensive handbag, someone who suits wearing pearls. I am not that person.

The skirt is okay and I am glad I had this experience with the fabric fraying.  I now know that I can wrestle this issue into submission!  There might be other fabrics that need the same treatment out there that I might want to sew with one day.

Oh hang on: I've already got one in my stash!  It is a light coloured coarse woven tweedy fabric that also looks very elegant, in a more understated and less bright way.  It would make the cutest mini skirt!


PS: This is dreadful, but I've since found yet another fabric very like these two. So I bought three at different occasions and didn't even remember the other purchases.  Why am I doing this to myself?  I must keep a proper record, like the Android app Clothio that seems to work pretty well.

Wednesday, 17 December 2014

A quick teaser

I have to post a very quick teaser.

I started on a project which is quite a challenge - and I think I can get a really good blog post out of it too  (Promises, promises!).

I saw the general technique somewhere: how to develop a dressmaking pattern to get a piece that curves and drapes and generally behaves in a relatively unpredictable three-dimensional manner - the technique is all about how to tame this apparently chaotic and wild appearance so you arrive at a useable pattern piece.  It's not even that difficult to do!

It sounds quite intriguing, doesn't it?

Well, I am completely in seven heaven with this.  This is just the sort of thing I absolutely love: -

Pattern construction, turning something 3D into a 2D pattern piece - figuring out what kinds of curves and angles work out how... I absolutely love that.

I saw a photo of a pretty special collar.  And I also saw a technique of how to sketch a ruffle that falls in a sort of waterfall pattern - and how you turn the sketch of that ruffle into a pattern piece. So therefore...

This blog post made a lot of sense.

I did try it with my collar and I think I got somewhere!  Like I said, this is just a quick teaser - I will write the blog post proper soon and hopefully take a good photo or two to illustrate the concept, pattern and technique.

Saturday, 19 October 2013

Drawn

 
I just drew up a back and front pattern piece according to my own measurements. This time I reduced the front dart (the one going down towards the hemline) by half and drew a second dart into the side seamline. I want to know what it looks like when you use two darts.  My template top relied on just the one dart into the side seam and I had no luck improving the fit of this top so far.  Frustrating.
 
I made up a muslin from my measurements before but I didn't draw the pieces further down than the waist measurement.  Because I get such a funny curve at the back (Yep, I have a swayback. Darn.) I can't quite imagine what it will look like when I just extend the length a bit and disregard the curved waistline.
 
I will presumably have to do a swayback adjustment.


For now I'll just cut this out in an old fabric (why did I ever think that a shade that's an unhappy mix of tomato and salmon would look good on me? What was wrong with me?) - and put it through its paces to give it a go: there's nothing better than doing for learning.
 
I just wish I felt a bit less aggrieved about having to mark darts - it's a job I thoroughly dislike.  That's the reason why I didn't get further on this and why I'm blogging about it rather than sewing...
 
Big sigh.
 
I think that the front piece looks so much longer than the back piece in that first photo because I didn't cut the paper off at the bottom.  On the other hand I'm not really, completely, absolutely sure about that.
 
I did hold the side seams against each other, they're both the same length.  That's got to count for something?


Saturday, 12 October 2013

FBA! Oh yeah, baby: FBA!

Teehee, forgive the exuberant title, but still.

I just did my first FBA!

Another technique for my sewing and dressmaking toolkit.  Utterly delighted that it worked.  Well, actually, I don't know for certain that it worked but I did hold the edges of all the relevant pieces against each other and I think I made the adjustments where needed.

Yeah.

So, FBA.  What is it?

FBA is short for Full Bust Adjustment.  Commercial patterns are made for women up to B cup size but they don't work great for anyone with a bit more up top.

So a full bust adjustment allows for both more width across the body as well as more length in the other dimension.

Here's a photo of one of my cut up and reassembled pattern piece, the upper front:


The technique involves finding the bust apex (the blue cross a little below the original bust point that looks like a cross hair symbol), cutting to it from the hem parallel to the grain line. Continuing the cut towards the arm hole, I picked the sewing mark to cut towards - but stopping short at the seam allowance.

This last bit then acts as a hinge that keeps the pieces together. [**] Then cut from the side seam towards the bust point but leave a hinge at that point (the apex).

You then pull the lower piece (the one nearer the side seam) away from the other main piece keeping the vertical edges parallel (those running from the apex down to the hem): move them right and left apart from each other by the measure that the pattern piece was too short by.

Put a strip of tissue paper underneath and tape down. (I did this in two steps: I taped one edge onto the tissue strip, then I marked the width where the other edge needs to be, drew a line down and then taped the other edge down up to that drawn line.  It can get quite fiddly)

Now you can then move the dart back to where it was.  The dart is just a bit wider than before to create a more rounded shape and larger cup size over the bust.

I checked the side seam against the front side seam and found that the above dart I drew in the thick blue line was a bit too deep, so I decreased this by a good centimeter in total.

You also need to adjust your piece that's closer to the front centre. Here that wasn't a problem because this piece ended in a point so I didn't strictly need to move the central piece down to come to the same hemline.

I also checked the lower front piece and the contrast fabric piece against all the new seamlines and extended them.

I had a bit of a hairy moment when the lower front did not seem to be wide enough at all.  It turned out that I forgot that both upper front pieces need to be sewn together first and the combined width would therefore lose the two seam allowances of the separate pieces. Makes sense once you think of it. Uh.

All's well that ends well.

Now I just have to cut out some fabric to see if the adjustment really worked. I might go the muslin route before I cut into my expensive wool fabric!

**Correction: I listed two steps in the wrong order before. Apologies, I now corrected this.

Sunday, 17 February 2013

Pink crescent shawl

I loved knitting this shawl, love the colour, love the yarn: Wollmeise in colourway Tutu Dark.


Unfortunately the stocking stitch made the edge curl up, some times all the way to where the lace starts.  I wouldn't have been able to wear it like that.  It would have felt like a thin bit of string that might threaten to strangle rather than warm the wearer.

So I picked up stitches all the way along the top edge and knit down, again in stocking stitch.

I had more yarn left than I thought and the resulting facing is almost three inches deep.  Once I ran out of yarn I sewed down each live stitch with cotton thread that matched in colour.

Blocking did wonders for this.  It really brings out the lace pattern beatifully.

The pattern for the lace came from a stitch book, it was called 'Branched Fern' there.  Although the stitch is quite logical it isn't exactly intuitive - I had to keep checking the chart even after quite a few repeats.

I love the way this shawl looks, I'm just not as convinced about the facing. Maybe I should have tried some kind of band as an edging.  Having hand sewn each stitch I won't re-do this.  I will give a different design feature a go when I try something similar in future.

Tuesday, 25 September 2012

Coarsewoven patchwork - how to put it together


This turned into a bit of a tutorial - based on all the drawings I came up with.  I thought that I could easily demonstrate how to sew this coarse woven block together with the help of a couple of pictures but that would have fallen short.

So here goes.

Chose three fabrics, cut them into a few strips of equal width. Pick the fabric to use for the vertical strips and cut these into lengths of four times their width.

You may want to cut a couple of squares off the other two strips (one of one colour and two of the other if you're making one block to try this out).  Sew these three squares to a vertical strip each, like so:

Always make sure to press seams open before sewing over them (if you never tried patchwork before: pressing seams open makes a huge difference. You'll be glad you bothered. Honestly)

Put the two strips aside and work with the single strip and square unit.

Attach two vertical strips to either side - but not for the entire length. This is where the partial seams come in - and it's these partial seams that makes this block come together so smoothly.

Start at the top and sew down about three quarters. You want to leave the stepped end open with enough room so you can easily sew another fabric against the end of what are, for now, the outer strips. That's for later though. For now just sew down about three quarters. Or two thirds if you prefer, it doesn't make much of a difference.

I drew in a light grey line where my partial seams end. The broken lines mean seams.

The graphics show the outer strips bent outwards, that's meant to show those ends being loose and not sewn against the inner, central strip yet. Not sure if this makes sense.


Next, sew the strip of the upper colour (bolded in the graphics) against the top of the three strips. I didn't bother cutting the horizontal strips to the right lengths but daisy-chained all my four motifs onto the continuous horizontal strip and then rotary cut them on the mat after that.


Then sew another two vertical strips against the outer sides, again with a partial seam.


Continue in this way (alternating vertical strips and horizontal strips working with the first two colour fabrics only) until you added four horizontal strips.

The next step gets a bit more interesting. This time attach one of the two strips with the square of the third fabric already attached. You no longer have to do a partial seam, you finally get to sew an entire seam in one go!


If you would like to make more than one block/motif at the same time you will want to attach the second block to the side of the first.  The broken line on the right is meant to show that this is a horizontal strip that is really longer than the square I drew.

Now flip the whole thing over so your first horizontal (bolded) strips are at the bottom and the side with your third fabric horizontals are at the top (the ones in purple/blue). You want to sew the third colour strip against the top of the three vertical strips.  I am showing one of the three vertical strips with a round edge, that's just meant to show that this side has not yet been sewn to the neighbouring vertical strip.


The next bit you get to do, finally!, is to close the partial seam where I drew the red rectangle in. I should have really done another graphic but I'm sure you get the idea. You need to close the first partial seam all the way down once you attached the second purple strip. Once that partial is fully closed you can attach the next purple/blue strip*, close the next partial seam and so on until you are done.


*: I am saying purple/blue strip because the colour looks purple on one monitor, but blue on another. Go figure.

Please let me know if the drawings and my description makes sense.

I loved sewing this. It was so much fun.

When I make enough progress with this project I will post about what it is going to be. Fingers crossed it pans out the way I imagine and hope.

Let me know in the comments if you have any questions.

Tuesday, 11 September 2012

Craftsy online class

Look what I just found on that clever thing called the Internet!

Craftsy do online classes, more specifically sewing classes!  And I enrolled myself in a particularly clever one called 'Jean-ius' or how to reverse engineer your favourite jeans!


Woohoo!  I'm so excited. This is brilliant! I've wanted to do a trousers sewing class for ages but found that they're pretty expensive, or even that the one I could have done didn't have enough people interested and therefore got cancelled.  Such a disappointment.

But here we go: can't do it physically?  Do an online class!

Those good folk at Craftsy deserve a mention:


Sunday, 22 July 2012

I learned something new!

I am delighted: I learned something new.

A technique to kind of twist two stitches without changing them around as you would when knitting a cable pattern.  Most intriguing!


This technique can be used to "twist" two stitches though not any more than that.  It involves knitting two stitches together and then knitting one of them again - it will look as if you had parked one stitch on a cable needle, knit off the second stitch and then knit the first stitch from the cable needle.

I had not come across this technique before - I am delighted to learn something new!

The intriguing thing is that the outcome is slightly different for the Right Twist [* no it's not] (knit 2 together without slipping them off the left needle, knit the first stitch again and then slip both stitches off) than it is for the Left Twist (knit the second stitch through the back loop, then knit both stitches through the back loop and only then slip both stitches off the left needle).

The Left Twist (LT) results in the working thread slipping back out of the second stitch when you knit both stitches through the back loop.  I can't see how to avoid that.  The good thing is that this is not noticeable on the right side of the work.

The Right Twist* (RT) does not have the same problem because you knit both stitches together first, then the working thread goes into the first stitch without slipping back out of the second stitch.  If you get me.

I tried it different ways but as I said I can't see how to avoid this.

I also tried the LT as knitting the second stitch through the front loop (not worth the effort) as well as changing the first stitch's needle mount first and so keeping that first stitch open (as opposed to twisted) but again it doesn't make enough noticeable difference and may even look a touch more wonky.  Strangely enough!

This all is most intriguing.  I love little itty-bitty details like that.  Very glad I came across the technique.

The book (a Barbara Walker Knitting Treasury book) also suggested that some cable patterns can be adapted to be knit this way so you don't have to use a cable needle.  Not sure yet if I want to try that but there are plenty of Twisted Stitches patterns in Ms Walker's Treasury books.


Update: * Okay for completeness sake I need to correct my false statement above: the exact same happens with the Right Twist as with the Left Twist.  I'm an idiot.  I just didn't look at it properly - the working thread does slip when this is worked in either direction.  I'm really rather silly for not realising.
Still, at least I figured it out in the end.

Sunday, 1 April 2012

Wahey! Version 2

And... voila!  Version 2


In pink this time.  Loads better than the blue one, still not as good as I'd like so I won't be making another one exactly like it.  It needs further refinement before I can use this as a template.

There is some diagonal pulling going on from the bust point downwards.  To be honest: I'm not really sure what causes that nor how to fix it.  I'll need to pop this on my tailor's dummy and investigate.  Maybe the bust darts need to be a bit deeper?

I am still glad how this falls from the shoulders, so that's a good starting point.  I'm happy with that.


I find the side picture the most interesting: I can see that the angle of the dart is rather too steep, I will raise the starting point.  The armhole is pretty baggy towards the top, that needs tightening up by taking the side seam in a bit more, both front (quite a bit more) and back (not nearly as much)

A spontaneous improvement on version 1: I used facings to sew behind the hems too - I did curve the front hem and wouldn't like any creasing from turning the hem just over.  I would have needed to steam the life out of it to get it to lie flat.


I am going to add a fastener at the top corners, just not got round to it yet.

The shoulders are definitely still too broad and I didn't cut the slimmer version rounded enough, I need to go in towards the middle a bit more because this bulges out a bit.  The centre back could do with a touch more cinching in than I did too.  Not sure if this will take care of the bunching up at the back of the waist - there is too much fullness there still.

All in all: quite happy with the improvement.  It was really interesting to work with a much stiffer less drapey fabric: much easier to sew but not as nice to wear.

I will have another try, again with a wearable muslin because I need to use up my stash fabrics.  I wonder what other material I have?  This one was a sort of quilt quality of cotton, it's a little on the stiff side for this type of top.

What I did hate about this are all the facings that need to go in.  I naively thought that this consisted of only two pieces: front and back, but when you count every single facing as well there are actually 12.  I must find out if there is something else I can use to prevent raw edges near the edges of the garment.  I don't want piping (don't like the look) but isn't there some kind of ribbon or braid that you can sew onto the inside to hide the overlocked edges turned inside?

I was even tempted to try rolled hems but that wouldn't be suitable.  I supposed I could just line the whole thing - I would grudgingly do facings for the neckline to make that sit better, but the rest?  Just bung in some lining in the right sort of colour on the inside.  I didn't mind the hem facings so much, they do improve the look of the garment no end and were much easier to deal with than turning the hem over twice but I did hate doing the armhole facings.  Just never-ending!

Maybe I should have a break from this top and start on my simple skirt template next?

Friday, 22 July 2011

My 'further reading' is on its way!

I went to Franklin Habit's wonderful class at Knit Nation called 'Photographing your fibre' and it was a great workshop.

I finally learnt the basics of photography - that's where all those seemingly tricky settings on your photo camera come in!  And surprise, surprise: they don't seem all that tricky, or certainly not difficult at all, when someone explains them to you in connection with the results you're hoping to achieve. Hah!

Like taking pretty pics for my Ravelry projects page.  Or even this here blog thingy.  Probably more the blog than the Ravelry page but my new found knowledge will, I feel entitled to hope, contribute to both!

Franklin recommended the National Geographic Guide to Photography, by: the Editors thereof.  So I had a mooch around the various online sites that get most of my book buying custom these days, and that's when things got a touch confusing.

It turns out that National Geographic has not just published one book on photography, but there's a whole series of them!

Yikes!

Now I was quite sure that I wanted the sort of beginners book that would explain the basics just like Franklin's class did so well. I wanted to go over all those settings again, and I was also very intrigued by Franklin mentioning that the guide goes into what to do with the digital snapshots on the computer with something like Photoshop. Fabulous!

So guides for photo film cameras as well as black and white photography were immediately out.  I also have no need (just yet, but give me time!) to get the one about landscape photography (I don't think my knitted projects have anything particularly panoramic to them...) nor the action shot photography that I almost dumped in my shopping basket before I realised that there's more than one (right at the very beginning before aforesaid confusion set in).

I almost got the one where the customer reviews describe their delight in having various Nat Geo photographers describe their tips, when I wondered if they'd ever taken pictures of knitting and came to the conclusion that, sadly, they probably hadn't.  Correct me if I'm wrong, but I feel quite certain in that little bit of crystal ball divining...

I briefly considered the 'People and Portraits' version (seeing as models come under people, and portraits might have to do with things being close up) but was put off by the fact that there are named authors and not 'the editors' that Franklin mentioned.  I could at least make the attempt to get the one he described!  No matter how difficult and time-consuming this endeavour was turning out!  No: perseverance, girl, that's what you need, I told myself...

So after a fairly lengthy process of eliminating all those that I felt weren't the most ideal first buy, I was still left with two books that I couldn't make my mind up between!

Here are their covers:


They are both called the National Geographic Field Guide to Photography, - the first one has the subtitle: Digital (I reckon that's a good one if I wish to sidestep all those tips that might apply to the old-fashioned photo film cameras and associated techniques) and the second one says: Secrets to Taking Great Pictures.

Well, I'm sorry! But I was sold on the second one!
I have no idea if this is a good one to get, but come on! The promise of learning secrets - I mean that's what gossip is based on, isn't it?  The allure of finding out something that not everybody knows, basically the definition of a secret. Though at least one customer review said that though they appreciated what they learnt, they were still left confused about just what those secrets were meant to be...

So you've already guessed the outcome: of course I got both. Duh. (This is me we're talking about: Ms Overenthusiastic!)

But only (that's my justification) because I went for the used option and got both of them on the cheap.  I'm sure the words in them are just the same as in a new book and should this copy ever fall apart I'll be able to re-buy the one that I preferred.  I don't mean to boast but including postage I got both for under a tenner (in Great British Pounds, or Sterling, that is) - none too shabby!

I'm very pleased with my shopping spree and I am even more delighted to be advised that both books were despatched already as well.

I shall keep you updated on what they are like and if I like them.

Thursday, 21 July 2011

Wasn't it lovely

Knit Nation 2011 was lovely!  I thoroughly enjoyed the market place and bought way too much yarn (definitely not a surprise, I knew I would and everyone who knows me knew I would as well.)

And Franklin Habit's class 'Photographing Your Fibre' was brilliant!

I tend to cycle through my hobbies.  Knitting has been the thing for the last two and half year when it was other things before.  Photography is one of them.

So I've been wanting to get better at taking photos for quite a while.  The Knit Nation class sounded great: combining two of my interests in a class given by someone who's blog I read and like a lot.  Brilliant combination!

It was fantastic.  I finally know what a f-stop is and what it does!  Hurrah!  It's about depth of field!
So if you've got your lovely model wearing a fantastic jumper you knit and want to showcase then an interesting backdrop is not a bad idea.  If however said background is so very busy that it crowds out the model let alone the great jumper, then that ain't such a great thing...

So if you set your f-stop setting to a measure that will reduce the dept of field so that the background is no longer in sharp focus but gets blurred out a little, then that's much better!

I learnt so much - about the types and sources of light.  I found out that trying to take photographs on a sunny, cloudless day is not the best way to go about it, and that a bit of cloud cover is much better because it diffuses that direct sunlight a bit.  Or you can have your model in a deep porch with the sun to one side.

Another very good thing to remember: keep the sun over your shoulder (if you're the photographer, ahem) to make sure that the sunlight lights up your model's face instead of framing a perfect silhouette if the sun is behind your model.

I really liked the fact that Franklin made the technical information about the settings on a photo camera so accessible and letting me connect them in my head with what I am trying to achieve.  The whole photography subject just doesn't seem quite so complicated any more!

Isn't that fab?

Now the only 'problem' is that I need a new camera... Not just want but need. My old one has been getting increasingly dodgy and I now know that it only boasts some preset settings (macro, portrait, mid distance and landscape, I think) and doesn't allow any further choice. Not something I can practice my newly won skills with!

I saw someone else's camera that allows you to display the settings you used to take a picture.  Now that sounds like an eminently sensible function to have!  I didn't know of this, I was already considering whether I needed to write up little cards with setting notes to include in the photo - while I'm practising. This is much better!

Yes, I do believe that I -need- a new camera...

Photos of the yarns I got are to follow.

Monday, 2 May 2011

Knit Nation - 15-17 July 2011

I am so excited!  I managed to snag myself a place on a specific class at this year's Knit Nation taking place 15 - 17 July at Imperial College.


I liked the description of many classes but didn't feel that I would get lots out of them.  I am happy enough to look for info about things I don't know yet, either online or by asking others.  But there is one class that I would give my eye tooth for!  (Whatever that might be)

I registered to do the 'Photographing your Fibre' class on Sunday given by Franklin Habit.  I immediately wanted to do this class because it would be very useful (I'd love to take better pictures for my Ravelry projects page) - and the description of the class convinced me further: I really, really, really want to do this! Badly.

The course info includes:
"...learn the basics of lighting, depth of field, styling and common fiber-photography problems like capturing true color, capturing stitch definition, and photographing lace. We will also learn how to make a light tent at home, cheap! You don’t need fancy equipment to make good photographs–the emphasis will be on getting the best possible images using your camera."

Tips on making a light tent at home!!  How completely, absolutely, totally fabulous is that?  I am over the moon!

I like the fact that students are to bring their own camera (so there must be some practice involved! And you learn with the camera you'll be using) and a project or two (boy, I can think of loads! It'll definitely have to be one black one, very difficult, and a funny colour like pink: for the trueness).  I am very keen on any tips to do with capturing stitch definition too - my favourite method of taking pictures involves taking lots of pics at as many angles as I can think of, in preferably day light, keep fingers tightly crossed and hope for the best!  Things have improved somewhat since I discovered the 'macro' setting on my camera, oops...

So I was already very excited about getting a place, about going to Knit Nation for the first time, and about what I was going to learn.  And then I finally got round to investigating the website a bit more, and my little beady eyes fell on some more information on Franklin Habit himself:

"Franklin is a writer, illustrator, photographer and author of It Itches: A Stash of Knitting Cartoons (Interweave Press, 2008). You can read his musings, essays, cartoons, and the adventures of Dolores the Sheep on his blog www.the-panopticon.blogspot.com Franklin has contributed to Yarn Market News, Interweave Knits, Interweave Crochet, PieceWork, Cast On: A Podcast for Knitters, Twist Collective, and writes a regular column on historic knitting patterns for Knitty.com."

Oh my gosh, I'm about to faint!  I've only been subscribed to The Panopticon's blog for utterly ages!  Love that blog.  I can't believe it's the same person!  (I still remember the blog post about 'fingering weight', look it up if you want a full-throated belly laugh, too funy for words...)
How do I luck into things like that?

I am just so excited, I literally can't contain myself!

Hurrah for a 'Tier 5 Creative Worker Sponsorship Certificate' whatever that might be, which makes it possible for him to teach in the UK.  Blog post on his Upcoming Events here.

- - -

I just looked at the list of vendors as well:

Artisan Yarns, Atomic Knitting, Blacker Designs & Yarns, Brownberry Yarns, Cocoknits, Debonnaire, Easyknits, GMC Publishing, Great British Yarns, Habu Textiles, Jeanette Sloan, John Arbon Textiles, Juno Fibre Arts, Knitting Magazine, Krafty Koala, Loop Knitting, NicsKnots, Nimu, Old Maiden Aunt, Purl Alpaca Designs, Renaissance Dyeing, Skein Queen, Sparkleduck, StitchMastery Knitting Software, Susan Crawford Vintage, Sweet Clement, Tall Yarns'n'Tales, The Bothered Owl, The Little Knitting Company, The Natural Dye Studio, The Yarn Yard, Twisted Angle, Well Manor Farm, Woolly Wormhead, Yarn Box, Ysolda

Some of these sound fascinating and I'm looking forward to checking them out!  I know Sweet Clement, Skein Queen, Artisan Yarns, The Bothered Owl and some other better known ones, - they do great stuff!  They really do.  There are some others that I heard of and I am very curious to check them out.  It'll be great!

- - -

The one project photo that I like best, is this one.  It is, of course, a complete fluke that it came out like that:

It was taken outside in day light, during a break in the rain - those bricks that I placed my project on were still pretty wet!  It was taken quite close up and I am not sure if the light wasn't a bit odd or not (what with the rain only just letting up a bit).  I was very surprised that the background came out as dark as it is.  The true colour of those bricks isn't like that at all, they are much lighter.  The yarn in real life is bright white - there is a hint of a creamy tinge in this.

I am so happy that I managed to get a place!  At 19:59 today I was sat hitting the refresh button to get to the registration page as quickly as possible and I was flying through the registration process - and it worked!  I have my confirmation email (I am still pinching myself to be honest!).
I am so very pleased, it's going to be very, very good!

I can't wait!

Monday, 27 December 2010

My pink Elizabeth Zimmermann Cardigan

An end to a long labour.


This project is finally finished. Which is a minor miracle, seeing how long it took me.


YarnMirasol Qina

Needles5 mm
PatternElizabeth Zimmermann's Green Sweater
fromSchoolhouse Press

 
I just looked back at previous blog posts about this cardigan and I am flabbergasted to find that it is the project I mentioned the most: in a massive five posts!

Not that you would want to look at them but just to show that I'm not exaggerating:

My first steeks!
Steek update
An inspirational pattern (all about The Green Sweater story!)
Something has to be done
My crafty state of play

I learned a lot from this project (also see my Ravelry project page).  I was aware that this incorporates quite a few things that were new to me like steeking, gauntlet cuffs, dolman sleeve shaping or the square neckline band. Oh, and phony seams!

It was huge fun to do these things, one at a time.

I learned that it's a good idea to do the phony seams before turning the hem up: ladder the rows of your "seam" stitch right back down to the bottom stitch (careful to keep the bottom stitch or it gets very fiddly!) and hook them back up with a crochet hook: pull through the two strands from the bottom two rows, then one strand from the third, and carry on like this (2, 1, 2, 1...).  It gives a very nicely defined pseudo seam up the sides!

If you do the hem first you may find that you sewed up the stitch you're meant to be laddering, which is precisly what I did. Ahem.

Steeks are not scary.  Amazing as it is: as long as you machine stitch at least a couple of lines either side of where you'll cut, you're not going to run into any problems of cut ends unravelling.  I have not tried crocheting instead of machine stitching.

What hasn't turned out so well:

The body of this cardigan is way too short.  It looks a bit ridiculous on me to be honest.  An unhappy discovery.  I suppose I could try to lengthen this but there is another problem: I disovered only now after the jacket had been hanging up for some time that the yarn is too heavy for this pattern.  What used to be quite a reticent square neckline to start with is getting bigger and bigger.  The shoulders threaten so slip off the hanger and I will definitely store this folded instead.

The applied i-cord (are you meant to do the button loops this way? I couldn't quite figure it out from the pattern) is a bit bulky although it stabilises the centre front edge very well.  Unfortunately it does not hide the gaping gaps in said centre opening because I think that I didn't get the measurement across my boobs right.

If I wear this cardigan unbottoned then that won't show up.

The sleeves turned out a little long (I thought I'd tried it on and determined the right length? But this could be down to the 'getting longer' in the shoulders problem that I mentioned above).  That's just about okay.

I may have to think of sewing in a staying band under the shoulders, that might improve things a touch.  So grafting the shoulders may not be such a good idea: seams would have made this more rigid.

In summary: I loved the techniques involved, I really enjoyed making this (even though it took so long), I may wear this every so often (I hope) but all in all I am thinking of making this again to incorporate what I learned.  Next time in a yarn that won't be too heavy to sit and drape lots better, and I would lengthen the body by about 2-3 inches.

The pattern mentions a variation of slimmer sleeves: that sounds very intriguing and I think I would go with that.

I am thinking of Jamieson's Shetland wool: there is a 2 ply which is called a jumper weight, there are some really lovely colours!  Keeping my stash in mind, I won't be buying any more wool any time soon though...

.

Monday, 10 May 2010

Continental Knitting - how to

Do you knit the English way, wrapping the thread around the needle with your right hand, and would like to try out Continental Knitting? The way of knitting where the thread runs through your left hand and the working needle picks it up. Continental knitting is said to be faster.

Here's a short how-to:
1. Pick up your knitting (a practice piece with at least a few rows, to avoid having to knit off the more rigid cast on row) and put the working thread any which way through the fingers of your left hand so that the thread comes over your left index finger towards your knitting.

2. Allow for an approximate one to two inches in length of this thread between your knitting and your index finger - make sure that the thread does not go slack. This is important.

3. Assuming you wish to knit (K1): put your right needle through the stitch to knit (from left to right) - as the tip of the needle comes up near the yarn, make a grab for it: from the top downwards or right to left: going from the right behind the thread towards the left/downwards depending on how you look at it.

4. This is my special tip: place the tip of your right index finger lightly on top of the thread wrapped round your right needle to help it through while you start to pull the yarn on the right needle back through the stitch on the left needle.

5. Continue the same motion (the motion of pulling the thread through the needle) into pulling the knitted stitch off the left needle.
With a bit of practice it can all become one motion: in, out, up, around, down, through and off the needle. I really like the fluidity of Continental knitting.


English knitting differs from Continental knitting in the number of steps needed: knitting the Continental way seems a little smoother to me because, as mentioned above, the motion of putting your working needle through the stitch goes straight up and into making a grab at the yarn and continues the same motion into pulling the yarn through the stitch as well as pulling it off the left needle.

In English knitting you place the right needle some way into and through the stitch, then the right hand wraps the yarn around the needle (unless you let go of your knitting, move your hand to pick up the thread, wrap it round your needle) before you go back to holding the right needle and prepare to pull the yarn through the stitch. I think of this as three steps (needle through, wrap thread, pull thread through) as opposed to the two steps of Continental knitting: put needle through and grab the yarn, second step: help the thread through the stitch (that tip of the finger does come in exceedingly handy! It's not strictly necessary though) and pull the knitted stitch off the left needle in one motion.

That's why it is meant to be quicker. It may also be more gentle on your hands because the movements of your hands are smaller.


You may try this and find it very difficult. One of the reasons I can think of is to do with how far you push the right needle through the stitch. I have seen some novice knitters hold the right needle clamped in their hand about half way down the shaft and push it about a quarter of its length through the stitch. I must admit that this gives a lot of room to play for wrapping your thread round the needle - but it also means that you have a helluva job on your hands to manoeuvre the needle back through the stitch without losing your yarn in the process. I would find this very fiddly and would therefore suggest that the needle tip has been poked through way too far.

Instead of thinking of your knitting needles as a set of two spears, try thinking of them as pens. You only use the tip of a pen to write with, in knitting you don't need all that much more of your needle than perhaps as much as two thirds of an inch - but this depends on the chunkiness of your yarn: If you're using rope give it a good inch, using 4 ply or even laceweight: make it half an inch. Use as little of the right needle as you can while still being able to wrap the needle round the working yarn and pull it through the stitch on the left needle. Using the tip of your finger to hold the yarn in place (around your right needle) really comes into its own when you try to use only the tip of your needle - this can become quite automatic very quickly and won't feel as fiddly as it sounds!

Helping a stitch through when purling:
I've also got a bit of a trick when purling: the tip of your left index finger won't be any help here, but what I noticed when I took a good look at what I do is that the nail on my right thumb comes up and touches the working yarn wrapped around your needle! Well, either the nail itself or otherwise the very tip of my thumb. It works wonders too.

The angle at which you hold your two needles to each other can also make a difference: don't put them at too steep an angle: 90 degrees or perpendicular is too much, but you don't want them aligned in one line either: there should be enough of an angle to allow you to easily poke the tip of your right needle through the stitch but not so steep as to make it difficult to pull the yarn through that same stitch. Experiment with a few different angles! See what works best for you. I suspect that this may be quite different for different knitters.

When purling you may start with the needles almost aligned in one line: much easier to poke your right needle through that way! When your thumb comes up to help keep the grabbed thread in place it also moves your needle into a different position and angle. Again: experiment with what works for you and what's the most comfortable.

There is another thing that I do that I never realised until I made myself watch how I actually knit: I have a funny little wobble going with my left hand. I move the thread on my hand a bit closer using a circular motion out of the wrist and rotating towards me while I grab the yarn with the right needle - the wobble is a bit different between knit and purl stitches but somewhat similar (if that makes any sense!). Isn't it funny what you get used to once you get into a rhythm? I guess that's also the secret of success with trying a different way of knitting: - once you have a rhythm going you know what you're doing and you can see how this may speed up your knitting and reduce the wear on your joints (maybe not, but I like to think so!).

The most important thing for successful Continental knitting is to not let the working thread between your knitting and your left index finger go slack. Many novice knitters are focussed on the right needle and the stitch and fish around for the yarn that's suddenly not in the space it's meant to be in. Your left index finger will have descended towards the left needle. Elizabeth Zimmermann writes about being self-taught (love that story!) and that she had the thread running over her index finger while it touched the left needle. Being naturally curious, I've tried to see how it would work: I cannot figure out how to make it work! Perhaps the thread ran across another finger, I don't know. My advice is to check your left index finger every so often to see if it's still in the right place. This wobble I was talking about above does happen to move your index finger quite a bit - there's the sort of action going on that your sideways overlocker/serger needles get into: not the up and down ones but those on the sides that go across the seam. It's not much of a twitch but it does seem to speed up my knitting a bit without me quite realising. At least I'm told that I am quite quick.

Holding your left index finger upright, which in turn stops the working thread from going slack, can have another advantage: if you knit quite loosely on a specific stitch (say knitting two stitches together), then your left index finger can help to pull the thread a little tighter. You want to avoid yanking the thread too much with every stitch because your tension will end up rather too tight. Allow your right needle to dictate the stitch size rather than pulling the thread so tight with every stitch that you have problems knitting those stitches off in the following row. If your stitches come out too loose, then pick a smaller needle size rather than tightening up your hands: it'll only give you cramps and will spoil your enjoyment of knitting.

Tension
I find that occasionally my tension goes a bit too loose on just a few stitches. It's a good idea to put the working thread through the fingers of your left hand so that it winds through twice. I start at the back of the little finger, put the thread between the little and the ring finger, let it go past both the ring and the middle finger, put it between middle and index finger so that it comes across the top of the index finger. At times I wrap the thread a second time around my index finger (forming one loop) - some yarns are so slippery that this might be advisable for the entire project. Other wool may be as clingy as a vine creeper that you want to avoid wrapping it round your index finger like the plague! If the thread slides through your finger at a manageable rate: you're doing absolutely fine!

As you try knitting in a way that you have never practiced before: your hands will start to clench quite a bit because you are trying to remember all the different bits at the same time. My tip is to let go every fifth stitch or so: it allows you to smooth out the stitches on your right needle that you just knitted and to move up those on the left needle ready to have a go at them. This will even out your tension across the row and avoid bunched up loose tension problems of too long runs before allowing stitches to move on the needles.

Don't be afraid of re-threading your left hand: you will want to experiment about how high up you want the thread to run through your fingers: too low down right at the bottom of your fingers and your yarn will not slide through your fingers and make the whole exercise very frustrating. Too high up and you run into the danger of losing your grip on the thread completely.

Readjusting your hands and also the thread on your left hand every so often also has another advantage: moving your fingers and hands a little bit will limber them up a bit and this will stop the very annoying 'this is not working very well so let's clench every single finger up' from happening. Because chances are that you are already holding your hands and fingers in a very stiff way and adding tension makes a not so effective circumstance only worse.

The other thing to look out for is how close the stitches on your left needle have pushed up towards the tip of the left needle: too close (meaning there are too many of them crowding towards tipping right off) and you can't keep up with knitting them off quickly enough, result: you drop some stitches. Too far down the needle means that you will pull the stitch open too much with your right needle and the tension of your knitted fabric is shot to pieces even if you work everything else really evenly. The stitches you just knitted off that are now sitting on your right needle: don't allow too many of them to gather there, sitting bunched up in front of and under the fingers holding the right needle - you want enough room to be able to use the tips of your right index finger or thumb without having to worry about dropping some stitches on that side.


I can only recommend that you let loose every so often, readjust your hands, check your index finger is holding the working thread straight (not slack) and looking back at the piece you knitted. You can check for tension problem (if you want to) and make sure you're not making life very much more difficult by knitting as if you're trying to produce a grid of knots. I've been there: when I started to knit my knitting needles would sometimes start to squeak! (I'm not lying: literally!) because I was trying to push them through stitches that were sitting way too tightly on the needles.


On second thoughts: seeing as you are only practising this other way of knitting: how about inserting a thinner needle into your knitted piece to use as your left hand needle, the one you're knitting from. The size of your left needle does not affect your stitches (the right needle does that) and you will find it much easier to knit the stitches off. Once you progress to knitting a 'proper' item in the Continental way (assuming that you liked the experience and want to take it a little further) then you may find that your practice has shown you how to knit loosely enough to make it an enjoyable experience. If you don't like the tension of the knitted fabric you could go down half a needle size - as long as you can knit as loosely as before. I can see the advantage in knitted fabric that is more tight: it won't distort as much as loose knitting, but I completely fail to see the advantage in tight, very tensed up knitting. I find it extremely frustrating, slow and perspiration inducing: which in turn serves to make things even worse! If your needles start making noises, then I would suggest you try to loosen up. It is very much worth it.

I am sorry that I have not included any pictures yet. I am not sure if I will manage any. I hope my descriptions are good enough to explain what I am trying to say, and not too wordy so as to become useless due to being annoying. I tried to stay somewhere between the two extremes.
If anything is not clear, then please ask in the comments - I will try to clarify. I also have some tips for how to make sure that your tension while purling is not a lot looser, but will leave this for another blog entry.
If you are interested in trying Continental knitting: do you find this blog post useful?

Thursday, 4 February 2010

Garter stitch in the round without purling - a link

I have just found a blog post about the most genius way of knitting garter stitch in the round without purling or wrapping a stitch when turning the work for another knit row when going the other way.

Here is the link:

http://fleeglesblog.blogspot.com/2010/01/modestly-named-fleegle-corner-trick.html

This is utterly brilliant and Fleegle is an out and out genius for coming up with this! Like someone said in the comments: I would have never thought of this. Not in a million years.

I just had to share this. This is something I will definitely try very soon!

Brilliant.