Showing posts with label muslin. Show all posts

Thursday, 5 January 2017

Day 4 on Project No 1!

Oh yes! This is brilliant: I made more progress sewing my first project of the year, a muslin of Burda 6230.  This is consecutively the fourth day that I've been sewing and even on the same project - I am making real progress.

I am so pleased about that. Perseverance has never exactly been a strength of mine.

I will update this post with a photo because it looks like I'm making a dress rather than a big blouse!  I am posting this without photo for now because I want to 'document' the date, just for my own satisfaction.  I can't quite believe I am keeping going on this.

Here are the photos:

Massive, isn't it?
Shows the seam and cuff details well

The back is also pieced together like the front

Not a huge lot each day, but enough.  I must say I've been almost anxious about the amount of sewing I have to do on this blouse, which is weird, right?  I mean if it gets too much then I'll just stop automatically, won't I?  It's not like the stitching is going to bite me for being a lot.

There are a few seams and I also have to do them twice: I am using welt seams (yay, first time!) on the piecing together seams, and French seams for the silhouette seams (don't know if they're called that: I mean the top seam from shoulder into top of the sleeve, and also the side seams).  The seams at button bands and collar get caught up so they are the normal thing.

I did overlock the bottom edge because it is a huge curve that won't come out right with either bias binding or double-folding over.  Bias binding would make it way too stiff, and a double folder over curved hem only becomes a mess of puckering.  And also being too stiff.  I'm back to my old favourite: baby hems.  Overlock, fold over once, edge stitch, done.

The black overlocking thread will be visible but this is only a muslin - I want to use white on the real thing.

I guess the amount of sewing felt a bit overwhelming.  Like I didn't really have a good idea of the big picture in terms of how far I got and was feeling adrift instead.  That does have the advantage that you feel like you got quite far all of a sudden, but it's a bit stressful when you're treading water, so to speak.

My anxiety also came from the fear that it wouldn't go well, that I would start messing up and then not be able to regroup enough to get back to a half way acceptable sewing standard.  I wouldn't mind on a toile but a) I want to practice becoming a more accurate sewer, and b) sewing very much stops being fun when it goes messy and wrong and doesn't seem to get back on an even keel.  That would just make me feel even more anxious. A point c) would be that this would reinforce old fears that I really want to get away from: I can improve a skill and I don't have to stick with make-do and oh-well-better-luck-next-time.  I am just so fed up with that.

Which means that I really appreciate and enjoy my progress. A few things could have gone a touch better (I'll know for the actual project: the sleeve pieces apparently not being quite long enough because they wouldn't meet everywhere exactly) but in a blouse this big the corrections of trimming won't be obvious at all.

I mean look at the dimensions: this is not a big blouse but a huge dress. It'll probably end somewhere below my knees!  I'll be able to chop off quite a lot for the sort of blouse that will look okay on me.  I also don't want to sit on the too long back and then have trouble getting back onto my feet.  I mean, come on.

Progress!  Job satisfaction!  Learning is being done!

Wednesday, 4 January 2017

New year, new project

I am incredibly pleased that I started to cut out my first project of the new year on the second day of the year.  That's an auspicious start of something I want to do a lot of: to sew and use up more of my fabrics.


I hadn't made up my mind yet about which size I was going to use, the largest might be something like XXXL (size 52).  For some reason I had left all the different sizes on the paper pieces but then didn't notice.  So I needed to change the sleeve curves that had come out a bit too 'curvy'.  It worked though.

The following day I cut out some more pieces and did a first few seams.

The pattern is one that I had to buy again because I cannot lay my hands on the tissue pattern, I have only the photo and instructions left in the envelope.  I checked in currently available patterns (as many as I could bear to look through) but I couldn't find a similar style: Burda 6230 is a very loose shirt, or what I call an 'over blouse' - a shirt you can wear over a heck of a lot because it is so over-sized.

What I like about it is that you piece together the front and the back: there is a horizontal seam line from the yoke that extends into the cut-on sleeves, and they have a diagonal seamline between the lower sleeve and the front/back so you don't have to use extra wide fabric.  See the black and white drawing on the pattern envelope shown above.

The yoke piece that extends into the sleeves ends near the cuffs in a sharp point. I thought that looked very clever.  Not so great for shortening the sleeves: I can't wear the oringal length sleeves, they're 10 cm too long!

My first 2017 project is a muslin of this pattern because I want to check that I shortened the sleeves correctly (that yoke piece needs to be sewn to the united front/back piece and the lower sleeve piece. I can't know if it's right until I've sewn that seam). And I also want to see what the length is like on me. It'll probably drown me!

But seeing how long this is as an actual garment is better for deciding how much I want to shorten it by once I use my actual fabric.  I want to use a white fabric with white machine stitching on it that I bought in a shop clearance sale just before Atlantic Silk in Electric Avenue, Brixton closed its doors for good. Shame, this was a good fabric shop, particularly the back area.  At least Simply Fabrics is still around.

I don't want to cut into this beautiful fabric and mess it up.  I have not seen another fabric like it in all the years in which I amassed my fabric stash - so I've seen a few.  It is pretty thin and looks quite crisp but I haven't washed it yet. It's just so much easier to sew with a fabric that still has that sizing layer on it and I reckon the pattern is loose enough that it can't shrink too much if it even does.

I still haven't decided if size 52 is right for me.  I didn't exactly chose to use that size because I blindly followed the outlines. Oh oops.

But I am sewing! And that's the main thing.  Very pleased.

PS: On the third day of sewing (4 January) I've assembled the front and the back and sewed them together at the shoulder/top of sleeve seams. The button bands are not attached on the inside yet but they are on the outside. I cut and interfaced the colour and will probably attach it next.

PS: I forgot that I blogged twice about this pattern, both in July 2016: That 'over blouse' pattern I've long been looking for and also: What did I do today?

Thursday, 8 December 2016

Simplicity 8523 changed to bias cut

This was a very interesting learning exercise: you can change a simple top from a straight fabric grain line (as intended by the pattern company) to one cut out on the bias.

It actually works!

I happened to come across an intriguing YouTube video (by Kair Bjordahl at National Sewing Circle) that discussed this, and even suggested Simplicity 8523 as an example. Which reminded me that I own this pattern and could go and have a look.

I did, I found it, and I had a go!  Nothing better than taking advantage of the sudden urge to sew. You have to go with the momentum of your sewing mojo. It would be criminal not to.


I did a full bust adjustment so it's interesting that the bias cut fabric does drag a bit at the bust. I reckon I used the wrong fabric: a polycotton that's a bit thicker than the usual thin polycottons.  I also didn't prewash the fabric so I have yet to see how the top looks after the first wash.

There is also a whole lot of bunching going on at the front of the upper arms: there are drag lines towards the apex. I often get this with pretty much everything I wear: whether shop bought or made myself. I have a feeling that I need a second dart.

I also want to see what difference another type of fabric makes.


I often have problems sewing the sleeves in. I managed a bit of puckering on the sleeve on the right.

Modern fabrics are not truly evenly woven so warp and weft behave slightly differently.  That's the reason why a bias-cut garment will not hang and drape completely symetrically. You can see this in the photo above.

Because of this bias-cut patterns often suggest a centre front and back seam, but you use up lots more fabric that way because the two pieces need to be laid so they form a V or chevron shape. That produces lots of fabric remnants in awkward shapes. You might be able to use them in applique or for patchwork.

I may also have cut the sleeve from the lower fabric layer at not quite the correct 45 degree angle. I have a feeling it may have shifted a bit. I really need to watch this more closely next time.  I lenghtened them by an inch to avoid that chicken wing look that I hate, but now realise that I could have gone with the original length.


I also had to adjust the point of the V-neck a little bit, it looked off by around 7-8 millimeter or so (just under a centimeter).  That was no problem because the pattern's V-neck was a little high and I wanted this to be lower.


The back doesn't look too bad but it is also slightly asymetrical.  I may want to cinch in the waist a touch more. I graded this out to a bigger size according to my measurements but think I overdid it a bit.

Oops, all bunched up

This was supposed to be a muslin to try this out and I will probably not wear it a lot because of the colour. I bought the fabric online with the intention of using it for patchwork but the colour is lots lighter than I expected.

This top is quite comfortbale despite the issues I described, so who knows.

I did not expect this pattern to fit me without adjustments but I had hoped it would be closer to a better fit. I knew that I might need a swayback adjustment but didn't want to bother at this stage.  It was an extremely useful learning exercise and I am pleased this fits as well as it does, even though that fit is not great.

Next time I want to use my own body block pattern to try another bias-cut top. In another fabric, hopefully something more drapey (it depends on my fabric stash: I have to use up what I've got as much as I can). And slightly shorter sleeves than these.

I will report my findings!


Monday, 5 December 2016

Delving into my sewing patterns: V1164

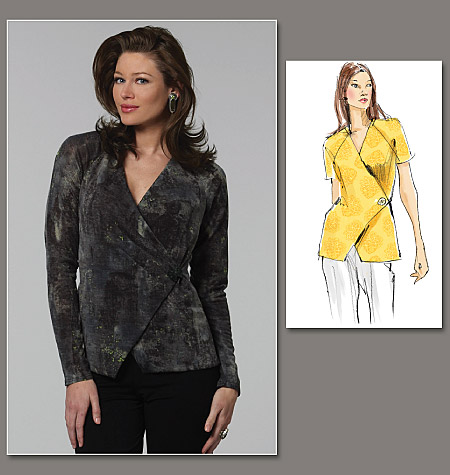
Following on from my previous post on my sewing pattern stash, I had the sudden urge to look at a Vogue pattern with interesting Dolman-style sleeves.  I am not at all convinced that these suit my figure but I wanted a look.

I didn't find it* and got a bit frustrated until I came across another pattern that I bought because it has raglan sleeves and wraps over at the front.  I thought this would make a great pattern to make up in all kinds of different fabrics.  Unfortunately I failed to see that this is for knit fabrics only.  Darn.  That's not what I was after at all.  I don't sew well with stretch fabrics.

V1164
This looks like it could be a really flattering style and I haven't made anything like this before. I won't find out what this will look like on me until I make it up and try it on.

For my muslin, I found a cheap pink stretch fabric left over from another project (that didn't turn out well, damn) and cut it out. And even sewed it up!  I am very pleased with that.

What I learnt from working with this fabric: there is absolutely no point for me to buy cheap and thin jersey fabrics: I hate working with them and they look saggy and cheap. And they don't wear well either because they wrinkle like mad.

I still have some fabrics that are almost as thin (in purple, grey and light pink) but I think they weren't as cheap and hopefully don't wrinkle as much. I'll have to check.  When I bought them I had visions of making long-sleeved T-shirt style tops as wardrobe staples. But if I don't enjoy working with them, nor like wearing them...

I should try those firmer knits instead. But then again I'd rather work with patterns for woven fabrics and erode my humungous stash of those. So there is no Ponte knit fabric shopping in my immediate future.

I did have to buy something for this project unfortunately: the front pieces of this need to be lined - to finish off the edges and to stablise them. I don't want to try a woven lining because I don't think it'll work and I had run out of stretch lining.  The pattern recommended stretch mesh or tricot. So I ordered a meter of light mesh. Who knows when I'll get that and if I'll still be in the mood for carrying on with this project.

The pink muslin showed that the style is promising: the V-neck looks good on me and I'll have to see how a slightly firmer fabric will behave in terms of fit around my middle and near the shoulders.

If I make this with short sleeves again I will want to lengthen the sleeves at the top by at least 1-1.5 inches.  I have enough fabric for long sleeves for the actual project. I just need that lining fabric first.

But even though I've run into this delay: it is really good to know that I made a start with a type of pattern I hadn't used before. That's exactly what I had in mind when I wrote the previous blog post. 

Brush strokes: mainly pink/purple and dark grey
Vogue 1164: View A in grey on the left has some darts near where the closure sits, View B in yellow doesn't. I tried the non-darted version in my cheap pink jersey fabric. The pattern of my project fabric would look a bit weird if darted so I will probably stick with View B (see 'Brush strokes' above).

Both views use the non-darted front pattern piece (2) for the lining.


*: I found the pattern since: it is V1239, Chado Ralph Rucci. This one:

V1239
I now think that this is also not suitable for me, because of the sleeves. Where they connect to the front and to the back is very odd: as far away from under the arm as may be possible to get. Very odd. Possibly an okay style for someone much less busty than me. So I will give this one a miss.
 
I would like to use this pattern to Frankenpattern the neckline part with another blouse pattern though (at least with rounded edges, not corners near the chin) - that line is beautiful.
 

Friday, 22 May 2015

Summary of my stash coping ideas


Where my blog posts are concerned, I often apply a lot of voluble outpouring in the verbal department.  I just can't seem to shut up.  Can't be a bit more concise. Not happy with that.

The very length of my posts threatens to bury the points I wrote about.  I am even less happy with that.  It took quite a bit of rereading of my previous blog post about stash busting (this one) to figure out just what my conclusions were that I had come to about how to manage my stash.

So I want to do a summary.  What did I learn, what ideas did I come up with?

  • I don't fear cutting into fabric but cutting out feels like it needs lots of effort
  • I don't have enough tried and tested patterns I can whip up
  • My stash is badly organised. As in not organised at all (gah)
  • I don't know my fabric fibres well enough to know what fabric is good for what kinds of garments
  • I bought several versions of the same thing because I forget what I have
  • I don't have enough colours or patterned fabrics in my stash

This leads me to the conclusions I came to:

  • I want to organise my stash lots better: put similar fabrics together
  • Use my stash app Clothio for lots more fabrics than so far
  • Measure the lengths of my fabrics properly
  • Put remnants and odd pieces aside
  • Examine each fabric thoroughly to get rid of tat
  • Put aside fabrics I can use for toiles/muslins
  • Look over my project ideas list to check my earmarked fabrics
  • Keep going on developing TnT patterns
  • Keep my self-drafted patterns in better order
  • Go through the fabric fibre bible I bought at the V&A
  • Chuck non-viable UFOs to lighten the load
  • Resign myself that I won't use most of my fabrics (sneef)
  • Use a specific fabric as starting point for the project
  • Get on with it: I can only learn from doing, even if badly. More sewing is the answer to so many different problems!

Ooh, I've had more ideas on practical ways of doing something with and about my stash. That feels very helpful. I want to really take hold of that last point: just get on with it!

I shall report back about how it's going.

PS: There is perhaps one more insight that just occurred to me: I don't want to use up a very special fabric on a pattern that I'm not sure of. I would rather sew that pattern with a less special fabric (it also reduces a bit of my stash) and perhaps make it a second time, than 'waste' the special length. I would be too heart-broken to find the pattern/fabric combo was awful. And you get more of a feeling of achievement out of a successful project even if the material used wasn't the most loved one.

Sunday, 9 February 2014

It's a hat!

Oh my goodness, look: it's a hat!


I started cutting out the paper pattern yesterday, thinking that I would slowly do a little more, bit by bit, every so often.

I seem to have been on a roll: I made a template to cut those eight shapes out a bit quicker (it was) - and all of a sudden I had pretty much all the pieces.  I used my go-to muslin fabric: I got five meters of this material years ago for £2 a meter.  Haven't done anything with it except use it for muslins.  Oh well, that's one way of getting some use out of it.

So then I sat down and sewed them together - assembly line style, just like in quilting when you sew the patchwork elements together without leaving long tails.  That part was really quick work.

I changed the shape of the visor a bit, I didn't like that beak shape.  I have never liked it, can't see myself ever wearing it either.

I have some iron-on interacing which was great to use.  It is so stiff it's almost like plastic.  I bought it to reinforce a very droopy shoulder on my white jacket that has seen zero progress for months.  Shame.  At least I'm sewing other things.  That makes me very happy.

I still needed to cut out the lining.  I found a thinner blue fabric that is also nicely stiff and went really well with this softer coat material.  I had drawn the shapes onto the fabric with one of those wheelie chalk dispenser - first time I used it.  It was a bit stiff and I hadn't expected there to be little spikes that left dots in the surface below.  Thank goodness I used it on top of my self healing mat.  I would have been gutted if I had damaged my desk.

And while I was watching a news programme online, I found that I actually cut all the eight shapes, as if by magic.  I surprised myself there.

So today I could get stuck in: assembling the lining, cutting the two strips for the band, and then attaching all together.  That was a pain.  The hat shape was a bit too big, which was good, but I had to squash it in in places.

The visor would only bend in one direction while I wanted to use it the other way round but can't.

Next time I'll cut two much bigger pieces of fabric that I can then use on either side.  As it was I didn't catch the edge of the underside all the way around so I had to sew that down with some dense zigzag/buttonhole stitch. I'll consider that an added design feature.

The only thing is, and I know this is kind of  a biggie, - I don't actually like how this hat looks when I wear it.  It is just way too big.  It drowns me.

Because I am not keen on the Orphan Annie look, I might make this again another time, smaller and less tall.   Maybe in a black fabric, something like that?

What projects have you made that went really well but you found you weren't going to wear them?

Sunday, 24 November 2013

Slippery pink stuff, blurgh


This is a rhetorical question: why did I ever think that working with slippery pink satin for my toile for the V8721 shrug was a good idea?

Oh yeah, I remember: I want this to be a wearable toile in case it works out. I'm absolutely sure that I'm not going to wear a toile made from faded, floppy sheeting but I can see myself wear something made out of this lovely pink fabric.

But oh boy, is it horrid to work with!

I had to re-cut one of the two big pieces because the lower layer of fabric slipped under the top layer.  The lesson from this is: use pins and not fabric weights on really slippery fabric - I had no idea how much a fabric like this can slide around while you're busy cutting it out.

And in case of any doubt: use at least twice the amount of pins you think you'll need!  If not more...

Horrid stuff.

But such a lovely colour!  And the sheen!

I might sing a different tune once I get this done, but for now I'm just not looking forward to the sewing part.  I can't help myself: I feel a headache coming on!


I bought this great book on garment construction.  The Fashion and Textile Museum in Bermondsey are selling an interesting collection of fashion design and pattern books.  I already own a few they sell so I didn't think I would be spending money when I went on Saturday.  Then I leafed through this one.  Must investigate further but it looks really good.  And useful!

We saw this exhibition at the FTM:


It was wonderful.  Very inspiring.
 
The first room, the Royal Room, was reserved for clothes made for and worn by royalty, in particular Princess Diana.  I was surprised to the see the apricot coloured Going Away dress she wore after her wedding.  I didn't like it very much, the chiffony bits were a bit much.
 
But right next to it was an aubergine evening gown that's utterly gorgeous! It had a very interesting folded and wound 'thing' going on at the bodice/neckline area.  I would have loved to see this better but the light was kept dimmed to protect the clothes.  Quite rightly.  This gown was my favourite in the room.
 
It was nice to see the sketches and then the dresses IRL.  Intriguing.
 
We were able to take pictures of the rest of the exhibit.  There were quite a few dresses in a very romantic vein - not really my cup of tea.  Some of the construction or embellishment techniques were interesting.  My favourites were the satin dresses that had pleating and folding: such wonderful shapes!
 
I was very intrigued by some of the seam lines on other dresses.  I must do a separate post on all those.
 
Loved it.

Sunday, 27 October 2013

...and in with the new

 
the front


This is only a muslin.  I didn't intend to make this wearable so I used a brown zip that I won't use for anything else and an old fabric in a very odd shade of pink that looks a bit like a messy mix of salmon and tomato in real life.

This is the result of my pattern-drafting, see my earlier blog post Drawn.

I drew up a front and back body using my own measurements, and a clever book on how to do this: René Bergh's 'Make Your Own Patterns'.
 

In my previous post I did say something about the curved hemline I am getting for the back waist.  The pieces for this are drawn a bit longer than the waist (disregarding that the waistline curves up, I just went with the longer measurement), but now I find that the top is not long enough.  The hemline hits my figure at a really odd point so I won't be making this in this length again.

The top was mainly a chance to see how my own measurements work out.  Oddly enough I have to take in the top 5-6 cm of the sideseams, just under the arms, by about a centimetre off front and back, tapering down.  I don't really understand why I keep having to do this, on both my own patterns and bought dressmaking patterns too.  It's as if my upper body is less wide under the bust than the average figure. Unless something else goes into this that I don't know about.

But I really thought this wouldn't happen when I use my very own measurements.  Perhaps the ease given is something I don't need?  Odd.  I might figure this out one day.  Just not yet.

the back

I learned that I like two darts much better than just the one.  And I found marking the darts not quite as horrible to do as I remembered.  I used a Frixion pen to mark them - you erase the lines by applying heat through ironing.  You just have to watch out not to press any area where you still need to see the markings.

I drew the bust dart in to slant up.  Now I wonder what it looks like with a dart from the armhole.  That will be my next project.

I am again really pleased that I was able to finish this.  I will take it along to my next sewing meetup to see if my more experienced friends can give me some tips about the fit.  It seems okay but I think it could be better.

My aim is a pattern that I can use over and over again - I was hoping to get a template out of my template top alterations, but that didn't work out well enough.  This approach is much better - I like the fit of this top lots better.

I just need to add a good 5-10 cms to the length if I want to make another little sleeveless top like this.  This is too short.

Saturday, 19 October 2013

Drawn

 
I just drew up a back and front pattern piece according to my own measurements. This time I reduced the front dart (the one going down towards the hemline) by half and drew a second dart into the side seamline. I want to know what it looks like when you use two darts.  My template top relied on just the one dart into the side seam and I had no luck improving the fit of this top so far.  Frustrating.
 
I made up a muslin from my measurements before but I didn't draw the pieces further down than the waist measurement.  Because I get such a funny curve at the back (Yep, I have a swayback. Darn.) I can't quite imagine what it will look like when I just extend the length a bit and disregard the curved waistline.
 
I will presumably have to do a swayback adjustment.


For now I'll just cut this out in an old fabric (why did I ever think that a shade that's an unhappy mix of tomato and salmon would look good on me? What was wrong with me?) - and put it through its paces to give it a go: there's nothing better than doing for learning.
 
I just wish I felt a bit less aggrieved about having to mark darts - it's a job I thoroughly dislike.  That's the reason why I didn't get further on this and why I'm blogging about it rather than sewing...
 
Big sigh.
 
I think that the front piece looks so much longer than the back piece in that first photo because I didn't cut the paper off at the bottom.  On the other hand I'm not really, completely, absolutely sure about that.
 
I did hold the side seams against each other, they're both the same length.  That's got to count for something?


Tuesday, 16 July 2013

Grey striped skirt muslin


I would like to make a skirt in a fabric with a bold pattern - a sort of statement fabric. Something big, bright, oomphy.

I am using Simplicity/New Look 6053, view E: the shorter A-line version.  I reckon it should be quick and easy, and contribute an item to my wardrobe that is desperately missing: I don't have a skirt that you could call bold, beautiful and out there. A definite gap.  In fact, I'm beginning to think that my clothes might be a little on the boring side.  Dressmaking to the rescue!

I'm using an old fabric to make a muslin, also called a toile.  That's a first draft version of a pattern, in fabric.  If you use calico or a fabric you wouldn't dream of wearing then you can drawn on the fabric to note any changes you plan to make, take it apart, and sew it up again.  If you make a muslin that you want to wear, it's a wearable muslin.  That's what this is, thankfully.

I'm glad I'm trying the fabric out as well, I had those five meters for yonks and only find out now that it isn't great to sew with at all. It is made of thickish white and black threads and if you pierce one the wrong way near the edge you might pop that end out of the fabric.  I no longer plan of doing 'proper' sewing with it - maybe I can use the rest to make the muslin of a coat, or something. I guess I now know why it was so cheap.

I want to transfer the pattern pieces onto lining paper so I can keep this to hand as a template. In aid of that I plonked a sheet of tissue paper on top of the commercial pattern and redrew the pieces.  Good idea right?  It might have been if I had kept my lines in the right place.

Having found that their measurement was narrower than my waist, I added an inch to the front piece. I knew that this would add two inches because you cut the front on the fold.  I really did know that and remembered it in my calculation. I really did.

So imagine my surprise when I tried the raw skirt on after I sewed the side seam. Yep, waaaayyy too big.
And I mean way.  Not just by two inches, but five?  What the hell happened there?

I think I must have cut that new tissue paper way too big, followed the wrong line.  Or something.

I had already overlocked all the edges and seeing as that uses up so much thread I really didn't fancy cutting the pieces narrower and starting over.  Instead I pinched off the excess material at the centre front and made it into an inverted pleat.  I reckon it looks quite good.

Isn't that what they mean by serendipity?  


I did cut the front facing to the actual width - more bulk is definitely not required near my tummy, no thanks. 

I sewed the centre back seam shut with a long stitch and attached the zip by sewing through all layers.  Then I ripped the seam back open.  It worked really well due to the thickness of this fabric. I tried this before on a much thinner fabric and ended up with wavy edges.

My pattern drawing and cutting skills were really not up to scratch: I also ended up with very uneven and skewy bottom edges.  I measured the same distance of 58cm from the top edge all the way round and overlocked this again.  Such a supremely useful thing that an overlocker cuts at the same time.

Then I used that trusty trick of sewing an edge stitch about 1.5cm from the edge in a slightly longer stitch length. Folded and pressed at that stitch line and literally only sewed along the edge again through both layers, this time at just over a centimeter.  That worked really well too: I am really pleased that I kept this stitch line at a very even distance from the bottom hem - I had not been able to be this exact before and the result is beautiful: really neat.  No mark of home-sewn, at least on the outside.

I had the most trouble attaching the side edges of the inner back facing to the zip.  There was too much bulk from the top seam and the overlocked edges.  I ended up cutting a corner off to reduce bulk.  Then I finger pressed the facing side edges, pinned and sewed them down to the zip sides by hand.

Done.

It took me about three weeks because I didn't muster a huge amount of enthusiasm.  When you're not all that keen on a fabric then you are not going to feel too inspired about getting it to the wearable stage. But I was so buoyed up by my previous project, the pink top, that I carried on with this and got it done in the same weekend. Happiness is when something works out.

I wore it to work today.  And would you believe it: it is still too loose!  It tends to slip slowly but surely and the front edge ends up below my tummy.  Not a great look.  When it comes to making this in a better fabric I will take it in by another inch or just under.  Good thing I am discovering this from wearing the muslin - if I hadn't I would only figure this out once I wear the finished article.  Then I'd have to redo something to rectify the problem with expensive fabric, and I would find that really depressing and discouraging.  I'm not sure if I'd feel as enthusiastic about sewing more clothes in future.

I reckon that going to the effort of making a muslin might just give you that extra motivation to keep going in a quest to learn and develop technical sewing skills.  It might feel like too much work to make a fabric draft version but when you get a second skirt out of it, it ain't too bad!

Now what sort of fabric shall I use for the 'real' skirt? Hmm...

Friday, 30 March 2012

I sewed something!

Oh my gosh, I am so relieved I cannot even begin to say how much.

I have been obsessing about sewing, dressmaking more specifically, for the last 3-4 years.  And yet: I just didn't get anything done.  Not finished I should say.

But look at this:


I broke through the block, I got out from under the jinx!  Yes!
I am so pleased.

It is by no means perfect, in fact the photos are very useful so I can tell where this pattern needs to be adjusted.  My plan is to get this right as much as I can - and then to put the two pieces onto some stiff paper (like wallpaper lining paper, that should do the trick) so I can use this as a template for all sorts of other designs: different necklines, with sleeves, buttoned at the front, wrap style, you name it.  I can embellish this by adding roses, origami shapes or flounces to the neckline, I can add a collar, or piece it together out of different fabrics, I can crop it or lengthen it - lots of possibilities.

Best of all: once I get the fit of this right I should never have another fitting issue as long as I want to make this simple style.  And I think simple suits me best.

I can see from the frontal photo above that this drapes well from the shoulder (thank goodness! That's the most important aspect that I think needs to be right first, everything else is secondary) - but I might tighten the side seams near the armholes just a little bit, lose maybe a centimetre at most.

The side photo: I am really aghast at how overweight this makes me look, I'm not that big!  So perhaps the side seams do need to be just a touch tighter down to about half way?  I'm not sure if this would work, I need to try that out.


I can see here that I need to make the centre front longer but keep the side seams the same length.  I want to shift the bust dart  at least an inch (bit more) further down - it's just plain wrong for it to end half way between the bust point and the armhole seam (who are these patterns made for?).  The front shoulder can be a bit less broad if I want a more close-fitting style.


I guess I need to look into a swayback adjustment (I think that's what it's called.  Not sure what it is nor what it does) and I can see from this photo that the back piece is much, much too wide at the waist. I think I applied my bigger waist measurement all the way around but I need to keep the front piece as is but use a smaller dress size (or two!) for the back.

The shoulders at the back are way too wide, they make me look rather broad-shouldered.  Carrying on from a slimmer shoulder at the front, I will probably want to go a lot further in - this will probably end up as quite a rounded armhole shape for the back whereas the shape at the front needs to remain quite straight down.

I am not sure if I am keen on the shape of the back neckline but I think this is quite easy to change.

I used this fabric because I have plenty of it and can't think of a suitable project, it seemed perfect to use it for what is really a muslin (or toile).  I didn't appreciate that the fabric is quite soft and is quite easy to pull out of shape - I would much rather use a plain cotton next time I do a muslin.

Now I just need to look for another piece of suitable fabric from my stash (I got plenty!) and then I can go for version number 2.

Oh, this is fun!