Showing posts with label shape and fit. Show all posts

Sunday, 28 July 2019

Getting to a super-duper adjusted pattern

My first toile

Warning: this got stuck in my Drafts for too long. I'm posting it now because I want to refer to this project. So here goes, you've been warned!

I did a one-on-one fitting session with a lovely sewing teacher in February 2018 (Fit2Sew). Mandy uses the Palmer Pletsch method of first tissue fitting followed by adjustments to the paper pattern.

It was fantastic!

I learned so much and I am so grateful.

My FBA was okay with darted tops but I didn't know the last step for a princess line pattern: you make the FBA adjustment only in the side piece (got it) and slashing towards the centre you close the dart you opened. The slash allows more space on the side towards the centre front where it is needed. Makes total sense.  Now I really don't know what I was trying to do instead. This shall remain a mystery.

I also found that my shape requires a horizontal slash and spread for my rounded upper back instead of the vertical adjustment attempts that I was monkeying around with (yikes!). At least I had a fairly good idea how to do the swayback adjustment but it was still pretty great to go over this adjustment...

Best of all, because I had no idea: I need to rotate the shoulder seam forward by a good centimentre which is completely obvious when it finally dawned on me that carrying my shoulders forward has a heck of a lot to do with my rounded upper back. Oh right! Yes those two things do seem connected, don't they?  I don't seem capable of an upright posture where you keep your shoulders back - just wishing for something doesn't make it true so I better go with what I'm dealing with.
Yep: there needs to be more fabric in the back pattern piece at the shoulder and a little less in front - and the answer is: Rotate shoulder seam forward!  Well darn it, that was obvious!  Better late than never methinks.

The session really brought home a decisive principle of pattern drafting.

Whenever you make any adjustment: you have to look at whether this pattern piece gets stitched to another. When you make one edge longer, the joining piece will be too short. You may be able to ease some pieces in, sleeves into armholes are a good example, but that only works for small differences and with some fabrics. It is better to adjust the edge of the other piece as well. They won't sew up well if not!  Whatever change you make on one side of a seam you need to make on the other side too. Undeniable logic.

McCall's Palmer Pletsch pattern M7352

So I have my lovely flare dress pattern all adjusted (I hadn't consciously planned to bring the Palmer Pletsch pattern M7352 for this class, but I had it so that felt like divine sewing intervention!).

After soaking up so much information on all the different adjustments I sank onto the sofa at home utterly exhausted - so knackered that I was only able to cut out the main pieces in a turquoise stash fabric the following weekend, and I've only got round to sewing it up this week (remember, this was all back in 2018).

I still need to do the neck facing, the hem and also cut out and sew in the sleeves. I want to do short sleeves (this cotton fabric wouldn't be great for long sleeves) but I haven't completely made my mind up if I'll go with the pattern piece from this design or do something else.

I considered a tulip sleeve that I fancied for ages but this stiff fabric isn't ideal for overlapped layers.  I could also slash and spread the piece for a flutter-type sleeve or one that could have an inverted pleat at the lower edge. May not be good ideas, I need to take the fabric into account.

I have yet another idea: a split short sleeve with the normal seam at the underarm position but also slashed vertically in half (adding seam allowances) for an open slit that runs from the shoulder seam at the top of the sleeve all the way down to the hem. Decide later if I want to leave the two pieces loose or sew together at the very bottom. I came up with this idea because I think it would make the sleeves easier to iron.  I might go for that.

It would be a nice challenge and if it doesn't work out I could still swap it with a standard sleeve. I have enough fabric for two lots of short sleeves.

Watch this space!


PS: The split sleeve idea didn't turn out well. Wrong fabric. Blog post to come.

Saturday, 11 November 2017

I sewed a little more

[Oh darn: this draft is from some time earlier in the year. Oops, forgot]

I have made a bit more progress on a couple of things. But nothing seems to get done easily, let alone quickly.

Issues with two skirts:

My black and white wool skirt still needs the inside corner of the vent sorted out, I'm not happy that I haven't done that yet. And I thought I was done with my second self-drafted wool skirt, the one in the heathery pinkish-red.  It isn't!  Sneef!

I had blind hemmed the bottom of the wool fabric hem to make sure it would lie flat. Then I hand sewed the lining to it. Well guess what: now the lining pulls at the skirt in plenty of places and I basically have to re-do that.

Or pull the blind hemming back out and I'd have to un-do and re-do at least some of the sewing on the lining for that too. It's not exactly a win-win situation - I'll have to do quite a bit of work either way. I do have the feeling that the blind hemming could continue to be a problem. Bother!

Update: I finally got started on this and it didn't even take long. Does it ever? You just build up this problem in your head and it seems insurmountable!  I put lots of pins into place and released the lining - sewing it back was the work of a half hour at most.

Here is the problem of the black and white skirt:


Folding the hem the wrong way at the back vent looks terrible!  Really amateurish.

Here is the inside:


I did plumb up the open bit a little so it's easier to see in a photo. But the fabric might have done that by inside when wearing so this definitely couldn't stay the way it was.

Another update: I finally got over the "but I've already hand-sewn it on!" feeling and re-did it. Again, it didn't take nearly as long as anticipated.


I don't like the asymetric jersey top in the Brushstrokes pattern, I can't see myself wear it because it doesn't look very nice on me. I am losing weight at the moment because I'm counting calories but it doesn't seem to affect my waist line in the slightest so the problem with this top will continue. Plus I'm bound to put weight back on at some point.

I need to get a photo taken of me wearing this to illustrate the issue:


Also: it doesn't help that the lining now turns towards the outside which you can see in the badly fuzzy photo on the left. Grumble.

- - -

I long wanted to make a dress with a waist seam in the shape of an inverted V or chevron. This shape might be called 'swallow wings'.  I didn't have the right sort of pattern and thought I could draw this myself, but I never did.

I found New Look 6183 which has this waist seam but it also has some rouching along the top of the front side panels where they meet the centre front panel. I wasn't keen on those but I tried the original side panel piece when I tried out my toile, and then folded the side panel piece to suppress some of the excessive length so I could sew this other side with less gathering.

I liked the lesser amount better because I feel that it won't show up my big tummy as much as the original rouching would.  Not sure if that's wishful thinking.


There are no bust darts: the top pieces are gathered under each bust. This is a style I have not tried before so it'll be interesting to evaluate.

I had set aside a cheap viscose fabric that I got in a closing down sale. This is a fabric that irons wonderfully well and drapes quite well too.  It is a fabric that's quite light though and the flimsiness means that this is slightly difficult to sew: both my overlocking and the straight stitches wrinkle up and make the seams pull.

A good press makes this a bit better but doesn't fix it altogether.  Rough skin on my hands also gets stuck on this fabric and I find that I have to drag it over my ironing board because it clings to it as well. I've never encountered this problem before!

These problems mean that I got rather disenchanted with carrying on with this dress and feel that I need to try the pattern in another fabric. It would be interesting to see if which gathering I prefer in a less light fabric.


So glad I managed to sort out the vent on the black and white skirt, hopefully I'm making progress with other things too. Fingers crossed.

Onwards and upwards!

Sunday, 29 October 2017

Spiral flounces!

Oh dear, I haven't posted in too long. I have been crafting but just not blogged about it. Still, there's lots ot catch up on then!

Just to show you what I'm working on right now, i.e. a little taster:

Spiral flounces!


I already pinned the two layers together. The outside curve is not perfect in so far as the distance between them meanders in and out rather a bit but I don't care.

I reckon they're pretty good for a first attempt. And it wasn't even as difficult as I feared:


This is what spiral ruffles look like when you straighten them out:


The top part will follow the curve of the neckline to begin with, starting from the shoulder yoke:


And the bottom part will then run alongside the blouse's button band:


I wasn't able to straighten this out completely for the photo, but you get the idea.

This is traced off the Oxfam blouse that I bought and liked a lot, expect for its pasty light blue colour and the fact that it is rather baggy under the arms. That the bust darts didn't point in quite the right direction didn't help either - all issues I can solve in a traced off pattern!

I will re-visit the paper pattern pieces and check about the outside curve. I hadn't thought to superimpose them to check how they would look one on top of the other. Now that I think about it, that would have been the obvious course of action! But you live and you learn.

I'll adjust the pattern pieces for the event that I want to make this again in another fabric.

I must say that I really adore the shapes that this spiral ruffles make. I wonder how big you could go? Must try that.


Monday, 23 January 2017

An interesting vintage pattern

I really like the new blog called Catherine's Patterns.  She is talking about vintage patterns and showing very beautiful examples. She will also introduce some of her own designs in the future. I am looking forward to that.

She showed a really lovely floaty number from the Jazz Age exhibition and a 1920s pattern from her own collection - both dresses have the bodice wrap around towards the back.  A really fascinating detail!

I must say that I didn't used to be that keen on vintage patterns because most of them look best on figures that are very different to my measurements so I feel that most vintage garments would not be ideal for me.

What I love about them is that many patterns show details and design features that you can't find in modern patterns. Take the side seam that Catherine wrote about: how lovely is that?  Have you ever seen a sewing pattern with this kind of side seam?  I don't think I have.

The follow-on thing from the above that I like about vintage patterns is that you can find very intriguing design ideas and if it is possible to isolate them from the rest of the pattern, then they might be a fantastic source of inspiration for copying to your own sewing projects.

Reading Catherine's blog made me think about what vintage patterns had found their way into my pattern stash (why does a stash feel like the Star Trek episode with 'The Tribbles'? They seem to multiply when I'm not looking).

And see, I had bought several!  Oh boy.

But most of them have some kind of detail that I really like and hope to use by Frankenpatterning the vintage element with a modern pattern that will fit me.  Not that I have already developed a template block pattern that fits me really well just yet, but I fully intend to get there one beautiful day.

Here is one I just had to get because of the collar, - well, the front view of the collar:

Vogue 9083. I believe this is a reprint so you can still buy this pattern

Just look how gorgeous this looks both as part of the dress and under a jacket too!  I just love it.

It is this kind of structural looking design element that appeals to me.  Having said that, the skirt is not at all bad either.  In fact I really like the pocket placement at the bottom of the side panel seam.  I wonder how difficult that is to sew?  It is probably a good idea to strengthen the corner of the centre front piece with a little bit of interfacing...

Never mind, back to the collar.

It tunrs out that it is not part of the dress.  The dress in fact is shoulder and strap less. The bodice part is a bustier shape with a horizontal seam across under the arms, and parallel to the ground all the way around. Who'd have thought.

The collar then buttons onto that bustier in four places on the front, the back of the collar hangs down and is not attached.

When I looked at the collar before I could study the pattern pieces, I had intended to make the back of the collar a very different shape to this sailor's collar rectangle. Perhaps a gentle curve across, or some more shaping to this curve.

I still want to go with a design change like that but I may have to make a top or dress that does have shoulders.  A collar that's much less high at the centre back could flip up in windy weather.  I am also thinking of sewing this to my top or dress (made from a pattern that fits me well) as if the back of the collar is a back yoke instead.

It would also make it easier to slip into a jacket without getting the back all squashed up.

What do you think of the idea?

Friday, 13 January 2017

UFO progress!

I am delighted. I was able to pick up The White Jacket again which had been a most aggravating unfinished object for several years.  I started numbering my projects when I began to seriously sew again a few years back.  This is project number S9!  That's how long ago this is.

This is how far I got today after some pressing and general fiddling about:

I 'only' need to do body and sleeve hems now

The photo below showed (half of) the stage I was at which gave me so much trouble.  I had followed the pattern quite faithfully and found that the shoulders are much too wide on me.  I thought it was going to be such a long-winded and time-consuming endeavour to unpick the sleeveheads and move them inwards by a good centimeter.

Until I started the first one. I took the shoulder on the left in and the right shoulder is the 'before' picture. Isn't that a huge difference?  The sleeve just dips off the shoulder on the right and makes the jacket look very home made. That one centimeter (or so) pulls the whole jacket off whack.


I literally cannot believe how little time it took to remedy the situation.  That should be a lesson to me to stop putting things off for so very long!

I had some other concerns that caused the delay. The jacket was supposed to have a lovely contrast material overlay of lace or similar on the lapels. See pattern:


I had decided against the mock pocket opening fairly early on - I didn't think that they would look good on my bigger figure and wouldn't add that much anyway.

But I was quite keen on those lapels.  They are the reason why I picked this pattern.  Even though I didn't want to include the other design feature (those black pocket borders) and also lengthened the sleeves.  These three quarter sleeves just look odd to me.
 

I had such a tough time trying to decide what contrast material to use.  None of the lace I either had or looked to buy was right.  Then I considered various ribbons and braids, some of these I bought (see the photo above), I just couldn't get all that enthusiastic about any of them.

I think I wanted a lace very close to that on the pattern envelope (how unimaginative is that?) but couldn't find it.

Encouraged by our upcoming UFO planning sewalong I was thinking about the whole project early in the morning when I had lots of time and no pressure to be anywhere.  It's very freeing: you know that you don't have to jump up and act on any sewing decision then and there, and it's just a lovely, relaxing time to think things through.

Not for the first time, this turned out to be a very useful exercise for me.  I visualised the steps I would carry out to get the lapels looking the way I want: to cut the lower layer smaller than the upper so the stitching line would not show up. Same thing for attaching the lapels to the front side seams: I would need to pay attention to the turn of cloth space needed and it all felt like a lot of fiddling around.

Plus I hadn't even washed my sample with the ribbon sewn on!  I would have been extremely annoyed with myself if any of the black colour had come off onto the lovely white jacket if I hadn't washed it.

So I finally had a very clear thought: I have masses of sewing projects that I started, it will feel incredibly good to get some of them completed and I have to admit to myself that I will not be able to finish this jacket any time soon if I have to faff about with it for much longer.  Plus: how much do I like these lapels when I think about the bother of getting them done?

Answer: not all that much.

So leave them off.  What a relief!  It was the best decision I could have made.  If I do ever want a jacket that has lapel lace overlays then I can start another project as soon as I have a lace I want to use.  And then maybe I won't use this odd pattern that has lapels as separate pieces.

I might write about this element of the pattern another time because it seems odd to me for lapels to be separate to the front jacket pieces. The whole stitching technique described in the instructions doesn't feel very promising - there is a lot that could go wrong.  But as I said I might write about this another time and can then include a photo of the instructions that make it clearer what they are asking for.


In danger of this post becoming too long yet again.  I can't help myself, I just attached straps to a tote bag that is taking much, much longer than I had hoped.  Here it is:

I "just" need to add lining to the inside so the black bottom doesn't catch too much dust and debris. The corner seams would just be dust traps.

Friday, 6 January 2017

Project massive blouse 6 January 2017

Even more progress.  I closed most seams though I feel a bit weird saying this, surely these aren't all the seams just yet?  I'll have to check but I do think so.

More photos:

Burda 6230 muslin, in muslin

This shows how thin the fabric is. The back
You can also see the seams on the other side. Cuff in place

Slightly better details

I "just" need to do the buttonholes and sew on buttons.  Once I know what buttons I want to use.  On the other hand I don't have a lot of sewing thread left, do I perhaps want some kind of snap or other closure instead?  I'll need to think that over a bit first.

The other thing I'll have to do before thinking about the proper project is to get photos of me wearing this.  I'll be able to tell how much shorter I want the white blouse to be.

I have the white fabric right here to use but I'm reluctant to jump into carrying on.  I feel that I need to take a little time to consider how I want the white blouse to be. The sleeves do drag a bit funny and seem to twist a little, luckily they are about the right length.  The cuffs fold back on top of them instead of lengthening the sleeves as I thought, but they're still a good length on me.

The cuved baby hems turned out really well, I'm happy I did them.  I also really enjoy how much I could practice my 'accurate' sewing. Looking quite good in most places!

The standing up collar seems a bit tall - it comes up too high and that make me feel a bit 'wedged in', like the collar is some kind of restraining device framing my head.

Problem: I'm not sure that I've got the collar right - it doesn't at all extend to the button bands. That's the complete opposite of the photo on the pattern envelope: the collar extends all the way to their edge at centre front.  How very odd.

There are no notches on the collar to show where it is supposed to hit any specific points, like the shoulder, so no help there.  I did sew the buttonbands on correctly: the instructions show a normal seam allowance, it's not like they mean for you to completely encase the front edges.  The width across also works on the finished article but for some reason the neckline seams too big for the length of the collar.  I might just redraft it and stop worrying about it.  But it is odd when something like that happens.

This is an old Burda pattern where you have to add seam allowance, the pattern pieces do not include them.  I realised when double-checking the pattern pieces: they needed to butt up against each other to fit.  I consulted the instructions (and highlighted that bit!) to make sure.  Newer Burda patterns follow industry standard of including the allowance, but they didn't used to.

I even went a step further than just highlighting the instructions - I even scrawled 'Add Seam Allowance!' in big, fat marker on a few of the bigger pieces so I'd remember when I use this pattern again.  I know how easy it is to forget and just cut out as normal.

I am please with how far I've got.  Now I need photos of me modelling it because the mirror only shows a static view and restricted angles.  Then I'll do some more thinking.

I will want to do more sewing now, to keep my momentum going, who knows I might just carry on with WIP!  Wouldn't that be a novel thing?

Wednesday, 14 December 2016

WIP: Sleeveless tunic with clever pockets

This is one of the unfinished objects (UFOs) that I want to include in the virtual sewalong event of the Dressmakers (LDC) group: "UFO: Alter, chuck or finish?".

When I bought YET more fabric a couple of years back, like this one that looks like brushed cotton or similar to denim, I felt that I needed to use the fabric up as quickly as possible and went with what I thought would be easy.

Use my own measurements, copy the pattern pieces off my body block and go with straight princess line seams (going straight up into the shoulder so no convex curves need pinning against concave curves). A yoke for the back to avoid needing to sew over eight layers of fabric, and a side zip.

Unfortunately this did not turn into a quick project because it's STILL not finished. Yup. Bane of my life.

I think the ideas above are not bad - they definitely make sense. It's just that I ran into some problems that I had not anticipated.


1) It is too big: the pins above show where I want to take in the princess seams so I can get at least the impression of a waist. My body block does not have much of a waist and that acts like a sack pulled over my body: it makes it appear even more dumpy than it is. Definitely needing improvement.

There  are quite a few layers of fabric, thanks to the pocket construction.  I don't feel very confident at doing a good job when I finally do take these seams in.


2) I already put the side zip in and quite well too, thanks very much, so I am really loathe to have to unpick it. Particularly as I managed to sew over the pocket layers.  Can I get away with just tightening up the princess seams or do the side seams also need cinching in?  How the heck would I then get the zip back in?


3) The pockets: I am so proud of their construction. The fabric layer that comes down from the shoulder then disapears into the pockets and becomes the inner pocket. The added piece that is the outside of the pocket will then go down to the hem.  Which means that the patterned FQ that's the pocket lining and that first fabric layer (the one running down from the shoulder) do not need to be as long as the hem. I just don't know yet how deep I want my pockets to be so I have not cut the bottom edge of both fabrics. That'll be easy.

The blue side is the right side of the fabric, the black side is the wrong side of the fabric.


4) Unfortunately I the pieces too much for the skirt part - I made these much too wide at the hem. I did not expect the fabric stiffness to turn the middle panel into the shape of a sky jump, from the bust downward: there is no dip - it looks awful. It emphasises my stomach too, horrible. This is actually the worst problem with this garment.

I have to take the flare down a lot. Unfortunately I don't know by how much and I feel anxious about messing up at this point.


5) I made a mess of the back yoke. The back neckline gapes so I just put some darts in and not at all well. I will have to unpick them. I only realised since this project that I have a rounded upper back and need small darts at the back mid shoulder point that will take the fullness out. Unless I try a dart at the centre back?  I'm not sure that this would work though.

6) I don't have a photo of the small of the back but I got that wrong too: I thought I could introduce a swayback adjustment by manipulating the shape of the middle panel of the back. And pinching a wedge out of the side panels before cutting them out. I may not have done enough of that because it hasn't worked.

I wonder if I have enough fabric left to try just the back again?  I may have to research swayback adjustments a lot more because I have the distinct feeling that I don't know enough about them yet to get them right.


So there you have it.

I put a few good ideas into this self-drafted pattern. I ran into some problems where my body block isn't good enough: namely at the waist and also regarding my swayback and my rounded upper back (my body block pattern actually has the darts drawn in - silly me decided to ignore them. Ahem).

I also ran into some problems that confounded me: how can this little bit of flare be too much?  And how do I get rid of it?

I think I would have carried on with this tunic sooner if there had been only a couple of problems. That many really put me off. The most decisive problem though is that I don't think I'll enjoy wearing this even if I do get it done.

On the other hand this tunic is a good practice piece to figure out these kinds of issues so I can use whatever I learn for future projects - I just didn't expect one single project where I get to learn quite so much!  It just all feels a bit too intense.

On the other hand and being brutally honest with myself, I might not have carried on even with just a single issue: I often grind to a halt and find it very difficult to motivate myself into picking it back up.  If I want to wear it then things are a lot easier - but if I don't feel the project, or can't visualise myself in it, then I have a huge sewing mojo problem.

Oh heck.

Trying to make up my mind about "Alter, chuck or finish?", I find myself in the "Finish" camp: I would really learn a lot and I want to see the pocket construction realised in a complete project. Even if I then give the whole thing away to a charity shop - if I don't wear it. Who knows.

I ought to decide which of the above issues I feel like tackling first - that would go a long way towards getting back into the swing of things on this project.

Monday, 5 December 2016

Delving into my sewing patterns: V1164

Following on from my previous post on my sewing pattern stash, I had the sudden urge to look at a Vogue pattern with interesting Dolman-style sleeves.  I am not at all convinced that these suit my figure but I wanted a look.

I didn't find it* and got a bit frustrated until I came across another pattern that I bought because it has raglan sleeves and wraps over at the front.  I thought this would make a great pattern to make up in all kinds of different fabrics.  Unfortunately I failed to see that this is for knit fabrics only.  Darn.  That's not what I was after at all.  I don't sew well with stretch fabrics.

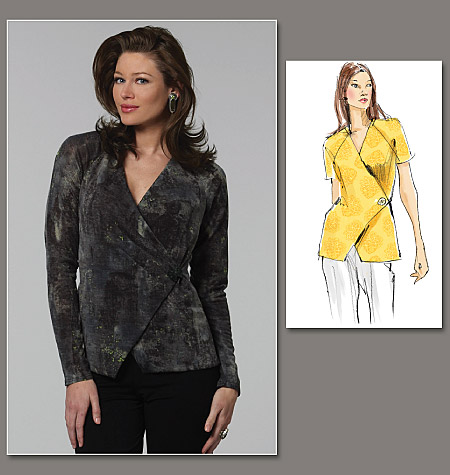
V1164
This looks like it could be a really flattering style and I haven't made anything like this before. I won't find out what this will look like on me until I make it up and try it on.

For my muslin, I found a cheap pink stretch fabric left over from another project (that didn't turn out well, damn) and cut it out. And even sewed it up!  I am very pleased with that.

What I learnt from working with this fabric: there is absolutely no point for me to buy cheap and thin jersey fabrics: I hate working with them and they look saggy and cheap. And they don't wear well either because they wrinkle like mad.

I still have some fabrics that are almost as thin (in purple, grey and light pink) but I think they weren't as cheap and hopefully don't wrinkle as much. I'll have to check.  When I bought them I had visions of making long-sleeved T-shirt style tops as wardrobe staples. But if I don't enjoy working with them, nor like wearing them...

I should try those firmer knits instead. But then again I'd rather work with patterns for woven fabrics and erode my humungous stash of those. So there is no Ponte knit fabric shopping in my immediate future.

I did have to buy something for this project unfortunately: the front pieces of this need to be lined - to finish off the edges and to stablise them. I don't want to try a woven lining because I don't think it'll work and I had run out of stretch lining.  The pattern recommended stretch mesh or tricot. So I ordered a meter of light mesh. Who knows when I'll get that and if I'll still be in the mood for carrying on with this project.

The pink muslin showed that the style is promising: the V-neck looks good on me and I'll have to see how a slightly firmer fabric will behave in terms of fit around my middle and near the shoulders.

If I make this with short sleeves again I will want to lengthen the sleeves at the top by at least 1-1.5 inches.  I have enough fabric for long sleeves for the actual project. I just need that lining fabric first.

But even though I've run into this delay: it is really good to know that I made a start with a type of pattern I hadn't used before. That's exactly what I had in mind when I wrote the previous blog post

Brush strokes: mainly pink/purple and dark grey
Vogue 1164: View A in grey on the left has some darts near where the closure sits, View B in yellow doesn't. I tried the non-darted version in my cheap pink jersey fabric. The pattern of my project fabric would look a bit weird if darted so I will probably stick with View B (see 'Brush strokes' above).

Both views use the non-darted front pattern piece (2) for the lining.


*: I found the pattern since: it is V1239, Chado Ralph Rucci. This one:

V1239
I now think that this is also not suitable for me, because of the sleeves. Where they connect to the front and to the back is very odd: as far away from under the arm as may be possible to get. Very odd. Possibly an okay style for someone much less busty than me. So I will give this one a miss.
 
I would like to use this pattern to Frankenpattern the neckline part with another blouse pattern though (at least with rounded edges, not corners near the chin) - that line is beautiful.
 

Sunday, 4 December 2016

My sewing pattern stash

For years I was careful about how many sewing patterns I bought: I didn't want to accumulate yet another stash that I can never fully use.  But then pattern buying also became instant gratification in terms of seeing it and buying it.  Not so much in actually making the garment.

Which is exactly the same problem with my fabric and my yarn stash. Thank goodness I don't have aspiration to start spinning my own yarn!  But I should also mention my stash of quilting fabrics and the three wadding pieces I own. Ah well.

Interesting style, but what would it look like on me?
V1381

I really like this Donna Karan skirt (Vogue 1324) and made it in a firm knit fabric.

Going back to my sewing patterns: I particularly like to buy those that I think may only be around for a time and then get discontinued.  They often have a feature I really like or present a sewing challenge - like Dolman sleeves or eliptical side pieces for a skirt that doesn't have "side" seams as such (V1324), see photos above. Or the envelope wrap below (V8721) that I made twice, and that then turned out not to suit my shape.

Ah well. You live and learn.

Great style, not so good on me
V8721
But way too many of my patterns are just sitting around and don't get used. Another source of frustration.

I had a good thought today: I want to become more familiar with the sewing patterns I own.

When I look at a pattern I like that I may want to buy, I do compare the line drawing to those patterns I remember. I hope I haven't bought too many that are very similar - it's an easy thing to do because the fabric, colour and pattern on the pattern envelope often makes us think that we are looking at a design we don't yet have. If all patterns showed the same colour and very similar fabrics then I don't think we'd buy duplicates as often as we do.

I think I've done pretty well. I hope. If I do come across a pattern that's pretty much like another one then I can get rid of one of them - which makes me want to identify them.

My purpose for wanting to become more familiar with my pattern stash is different: I want to figure out what kinds of designs I have and how they work with my body shape.

I like wearing this top, but does it suit me?

Some time back I made about seven different versions of an easy kimono style top.  Two of them are tops I actually like to wear (like the grey one above), the others not so much. It is just not a style that's flattering on me. So I'm determined not to make any more.

I only made a muslin of this one, and threw it out straight away because it was so awful on me:

V8877: Nope, not a style for me: no bust dart

But what styles do suit me?  I'm not actually that sure.

I think anything with a low but narrow V-neck would be great. Anything that doesn't emphasise the waist. Styles with bust darts are good, those without are a definite no-no (see V8877 above). Boat necks are out, cap sleeves that are too short look awful and I like to lengthen them by at least two inches, then they're great. Trousers and skirts with flat fronts are good. Skirts that flare from the hip are wonderful.

I figured those kinds of things out.

But I do have patterns that don't necessarily fall within the above - or at least I'm not sure if they do. And it is those patterns that I would like to try out: just cut out, make up in any old fabric (I have so many!) and see how the design works for me.

It would make me use up fabric, increase my sewing mojo and allow me to learn more about what suits me.

I am very hopeful that I will sew more with the above in mind.

Wednesday, 27 July 2016

My holy grail


My holy grail is to develop pattern blocks that I can use as Tried & Trusted garment templates.

One of the reasons why this is taking is long, is that I keep starting over.  I forget where I got to before and I was also not particularly happy with the last result so I am hoping that a do-over might be more successful.  So it’s not been going all that great.

I’ve since discovered that there are several fitting issues that I need to do adjustments for.  I start with a block that I drew to my own measurements in a pattern drafting class.  Great start but not nearly good enough – the fit is by no means close enough. Here’s all the issue I identified so far:

When using commercial patterns I usually have to move the bust dart down which is no big deal: cut out a box that contains the dart and move up or down so it points towards the bust apex.  Easy.  I have also done full bust adjustments (FBA) with abandon: this makes fit so much better for sizes that are bigger than a B cup.  I can highly recommend it.  You may need to cut a Y Line for very big cup sizes but it’s not a big deal or huge change from the usual FBA.

I am aware that I need to do an underarm adjustment that pinches out a wedge of up to 5-7cm length and possibly 1-1.5cm width – right at the top of the underarm side seam – unless I want lots more ease for arm movement, but it still looks pretty odd if there is too much fabric flapping about under the arm.  So this is a usual one.

I recently realised that I mustn’t suppress the small dart in the back shoulder: I really do need this because of my rounded upper back.  I only noticed that back looks different than I expected when I saw a photo of myself – now this issue is glaringly obvious!  Oh well, at least I know now.

I should also check if my armhole gapes at the back – if so I may need to do more of an adjustment for a rounded back by putting in darts or having a shaped back yoke that suppressed some of that gaping – I’ll need to check.

I have also become aware that two darts towards the bust are better than just the one.  It distributes the excess fabric better and is more flattering.  Best for me are darts that run into the side seam and result in an upward angled line, visually much better than downward or straight across.

And I’ve come to the conclusion that I can’t get around some major work on a swayback adjustment.  I know this from my knitting projects but hadn’t been paying lots of attention to it for my sewing.  I applied a couple of SBAs but I think I didn’t pinch out enough.

The one adjustment that I don’t think I need to do is to rotate the sleeve, i.e. changing the shoulder seam either a little forward or backward. I am exceedingly glad about this, because this feels like a major adjustment!

So these are quite a few adjustments so it’s no wonder if my efforts haven’t been all that successful so far – there is lots to do and I don’t think that I applied all of those to one block yet.  I really should.

But I was getting frustrated with my attempts at a template top that fell far short (I just hadn’t followed through on all those fitting insights yet) – then I had a thought:

Why don’t I look at Ready To Wear tops that fit me well and take some measurements?  That way I can compare those to my template top attempts and at least sense check!

Great idea, right?

I was thinking of a smart top with short sleeves that I like wearing a lot.  It is the only one that has a round neckline with a vertical slit down the front – it seems a pretty flattering style, so I am all for using that as a model.

Yeah, right…


It wasn’t until I took a really long hard look at this top, and found that it doesn’t fit at all well!  I just never noticed, good heavens.

This top is made for hips that are far bigger than mine, in fact it balloons out a lot. And the underarm adjustment of that suppressed wedge that I talked about above, that’s so very much needed!  The bust seemed to fit pretty well but the underarm area has lots of fabric that’s just not very attractive.

This top also highlights my problem area:  I am low-busted so there is excess material at the side of the front armhole.  My problem is that I don’t quite know how to get rid of that – do I need a bust dart in that area that grades out to nothing at the seam with the sleeve? That can’t be quite right, can it?

I think I need to play around with taking a bigger wedge out of the top underarm side seam from the front piece only.  This will also affect the sleeve – I may just have to slash the sleeve pattern and overlap by this much at the armhole seam.

Pattern drawing challenges!

I love them really.  They are just a lot of work and I need to be in the right frame of mind.

Sunday, 17 July 2016

The beautiful sleeve feature of Lekala #4370

... and how to sew it!


You can get Lekala patterns via Etsy too

I think I figured it out. The instructions on how to insert the top of the sleeve into Lekala blouse pattern #4370 are not very helpful at all.

This is what it says:

"6. [...] Pin sleeve, right side together, and sew on short vertical edge from mark upwards. Snip front and back between dart lines from shoulder seam to horizontal marks. Sew section of shoulder seam, from slashed section exactly to sleeve connection line, inserting sewn section of sleeve. Serge seam allowance. Sew shoulder edge to neckline. Serge seam allowance. Lay upper section of sleeve (epaulette) on front and back, evenly distribute the width. Sew the dart of back and front with one seam, catching upper edge of epaulette. Serge seam allowance."

WHAT???

That makes absolutely no sense. The part that I left out (denoted as [...]) reads: "Turn lower edge of sleeve twice inside at 0.5cm and topstitch. Trim seam allowances on sleeve in corners according to marks."

Let's take that one at a time: "Turn lower edge... etc... and topstitch" must be about hemming the sleeve. 'lower edge of sleeve' equals sleeve hem, got it. I didn't do that - I don't like how double-folded hems pucker and won't lie flat. I think they are ugly and way too tricky to sew. I like my baby hems but then I am very lucky to own an overlocker: I overlock the raw edge, machine baste my intended folding line using a 0.5cm stitch length, press the seam allowance over with the iron, folding at exactly the basted stitch line (makes it easier to fold over too, it's not just a great guide) - this shrinks the seam allowance in curved bits so it's all good. Then I edge-stitch the hem by machine an even amount from the hem edge, depending on the weight of the fabric: thin fabrics closer like 1mm, and others with a bit more of a distance: 2-3mm (I haven't done this with chunky fabric, it might be better to use an inner facing [maybe out of a thinner fabric that colour matches?] instead of folding the edge in)

Next point in the left-out bit: "Trim seam allowances on sleeve in corners according to marks." - This is the bit I understood! Yay me. There are short diagonal marks within the seam allowance only in the corner between the epaulette part (I called it the rectangle at the top of the sleeve head. Okay-dokey 'epaulette' is shorter, let's go with that) and either side of the sleeve. That needs to be snipped (staying within the seam allowance, you don't want to slash into your blouse's visible sleeve fabric), otherwise those corners just won't sew well and it would look terrible even if you managed that. And yeah, stating 'trim' is not the same as 'snip' but I think that's the poor translation at work.

So far so good. Where the instructions lost me was: "Pin sleeve, right side together..." ...and my brain went: What??? What the hell is that supposed to mean?  I think the clue actually lies in "sleeve" instead of "sleeves" - I didn't catch that the first two dozen times when I read that. (And I think it should say "right sides together", there ain't just one if it's two things being put together)

Where the instructions fall down severely is that there isn't much in the way of marks on the sewing pattern. There are those diagonal marks (yep, found that, that's cool) and there are also horizontal marks that intersect the darts, both on the front and on the back piece. But there is absolutely no placement line for where that blasted epaulette is to go!  (The counter part to the sleeve notches are also missing on the front and the back piece pattern pieces. Tut. But you can wing that)

That's a really bad pattern design.

I had decided that the epaulette part would have to be stitched on top of the outer part of the front and back piece across the shoulder seam. There is no rectangular shape that the epaulette edges fit to. On the other hand there is no need to have only one layer of fabric at the top of the shoulders if it is easier to just sew one layer on top of another. I'm fine with that.

But why in god's name can't there be placement lines? That's what I want to know. It would save a lot of headache.  The other desing downfall of the pattern is that the sleeve pattern piece is not marked about which side goes towards the front and which the back. That's terrible.

I worked out that the shorter, more curved side goes towards the front, and the longer, less curved side towards the back. That works. In fact the initial curves (at the outside corners, where you sew the lengthwise sleeve edges together, the point where that seam hits the body side seam) do actually fit very well into the armhole (again: the missing notches are not desperately needed). Success!

But then... blimey! At some point you have a heck of a lot of sleevehead edge that's excessively long and that's to be fitted into the normal sized armhole? No-one said anything about gathering and the pattern drawing doesn't show that either. So how is that supposed to work?

The bit where it says "evenly distribute the width" does not express the same as 'gathering' and I decided it just means to place the width evenly across where you're going to stitch it down. But flat. Definitely flat and ungathered.

And here's where the light bulb suddenly came on: "Pin sleeve, right side together" - that's just one sleeve, and you pin one bit of this sleeve to another bit of itself! Seeing as the text continues with: "sew on short vertical edge from mark upwards", and the mark was those short diagnoal marks in the corner that were snipped, it must mean sew one of the short vertical edges (of the epaulette) to the other short vertical edge of the sleeve - in effect producing a box pleat!

Flipping heck!! Couldn't they just say so?

The flat width of the epaulette (from stitch line to stitch line) is 20.3cm. The distance of marks across the front dart to the mark across the back dart (once the shoulder seam is closed which you're not supposed to just yet) is 10.4cm - not quite half of the 20.3cm but what with turn of cloth, this works out as near as damn it: sewing right side to right side of the short vertical edge must mean that you end up with half the epaulette width!

Bingo.

Phew!  I think I figured this one out.  There might still be some other surprises in this project to do with the sleeves but I think I've got the most difficult puzzle solved.  Where the 'snip' and 'slash' instructions are concerned: forgive me but I don't think I'll do that. I think they ask you to cut the exact center along the length of the darts (not too far) but that leaves very little fabric on either side once you closed those darts "catching upper edge of epaulette", this could so easily fray in these areas - ruining a beautiful blouse. So the top edge of the epaulette gets inserted through the slash in the fabric between the dart legs? Why do I need to do that? Can't I just sew the upper epaulette edge to this placement line of the dart legs that are closest to the body centre? It'll keep that folded in seam allowance on top of the right side of the body fabric but that's hidden at the top of the sleeves, no-one is going to see that, at least not without gusts of wind.

"Snip" and "slash", yikes. No, I'd rather not, thanks all the same.

I shall report how I get on with the rest of this.

PS: In case you are wondering why I am going to the trouble of persevering with this very challenging pattern: not only is the drawing of the blouse very pretty but the real thing is even nicer! I am using a slightly heavyish  polycotton that drapes very nicely and those sleeves are just gorgeous!  They fall into the most amazing shape and I've not even sewn them in properly yet. I can tell from holding my 'box pleated' sleevehead to the blouse. Gorgeous I tell you!

I would love to do another version of this blouse - maybe with a back opening and a high rounded front neckline... Hmm...

Friday, 26 February 2016

Ghastly fitting issues

Argh!  Sometimes fitting issues can really drive you round the bend, utterly, stark raving bonkers mad!

Why won't this body block fit better on me?  How comes I keep changing the slope of the shoulder when they clearly don't fit well, and the change is even more wrong than before?

Ah!  There is an answer in store.

Here's a photo, of me in a jumper I knitted:


I saw this and thought to myself: oh, rounded upper back...

Did that sink in?  Did that mean anything to me?  Did that lead me to any kind of 'Oh my gosh, that's it!' insight?

No, of course not.

It should have done.

I have a lovely body block drawn to my very own measurements.  There are small darts at about the mid shoulder in the back piece.  To my utter shame I have to admit that I kept looking at that itty bitty tiny little dart and decided: oh, I don't need that!

And off it went. Suppressed, removed from each and every single pattern I draw from this body block and unfortunately also suppressed from my consciousness.

Well!

It really ought to have told me something when changing the slope of the shoulder just doesn't produce the desired result (because it takes from both back and front, probably in equal measure).  A dart starting at the middle of the back shoulder and going down sits at 90 degrees angle to that alteration - of course it's going to produce a different outome!

Duh. Now why didn't I think of this earlier?  This whole threedimensionality business that bodies are subject to seems to be a really complicated affair.

There really is nothing better than having a friend take lots of photos of you in the offending garment: from the front, from the back, about three snapshots from the side: the side of a garment can sometimes not be clearly seen with the arm hanging down (1), so arm forward (2) gives a different view than arm back (3). So that's five pics.

You might want some more detailed shots that are closer up.

Pinching excessive fabric out and photographing the before and after can also be very helpful.

Get yourself those photos (making sure the lighting is suitable), study them!  And think about where the fitting issues might come from.  Some of the time my first inclination (change the shoulder slope) only serves to complicate the issue because it tries to solve a problem that wasn't there (like sloping shoulders. I hope we can agree that my shoulders do not slope to a pronounced extent?).

I would love to hear about insights you might have had that turned out really useful. Has something like this happened to you?  At least hard-won insights do tend to stick around longer, that's an advantage!

Sunday, 13 September 2015

A pattern for knit or woven fabric?

Is a pattern described as 'for knit/stretch fabrics' correctly marked, or is this a mistake?

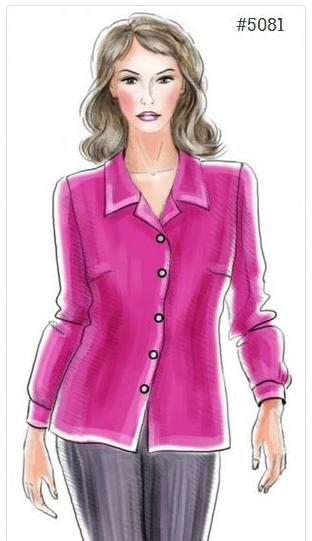
This Lekala design is marked as "Fabrics: Knit. Is stretchy: yes":


Design 5081 is a long-sleeved blouse with bust darts, plackets and a button band.  I have never seen a knit/jersey/stretch fabric pattern with all these features.  Patterns for knit fabrics usually take advantage of the fabric being stretchy whereas patterns for woven fabric cannot: woven styles need openings along the front as well as in the sleeves, they need shaping in the bust area - knit patterns also don't feature completely flat pieces (the front and back of this blouse) but often include some kind of draping which woven fabric does not do well.

I must say that when I first saw this pattern I just assumed it was for woven fabrics. Assuming is always a big mistake, in dressmaking as much as in other contexts!  I cut out a polycotton fabric and started sewing.  It was by chance that I looked at the pattern again and finally saw the 'knit' reference. Oops. But really?

The website lists this pattern 5081 when you filter on 'woven' - so that seems to point to the knit description being wrong.

For these reasons I think that this pattern was marked incorrectly but I can't be sure.  What do you think?

~ ~ ~

I would perhaps not have noticed the 'knit' claim if it hadn't been for the sleeves:


When I sewed the sleeveheads in I just couldn't make them lie flat - the curved seam around the top of the shoulder is all puckered and distorted even though I applied the normal technique: two rows of gathering and distributing the fullness of the sleeve material very carefully by pinning every centimeter.  No joy.

I also found an issue with the shoulder width that is down to me.  I used some of the Advanced features that allow you to customise your pattern beyond the standard measurements of height, bust, waist, hips etc - unfortunately I didn't realise that my shoulders are a bit narrower compared to their measure.

You can just about see how the shoulders dip down at the seam to the sleeves in these two photos:


So I will rip the sleeves back out and cut the shoulders a bit narrower. Only by 5-12mm or so.  That should take care of the sleeveheads being slightly too big and make sewing them back in a lot easier.

At least I hope so. Fingers crossed.

I am also wondering if I marked the correct centre front because these pieces barely overlap - or do I need to do a FBA?  That would be weird seeing as this is a personalised pattern.

The advantage to turning the sleeves into flat pieces again is that I can correct something I forgot to do:  I didn't sew the plackets on when I should have (what a mental lapse) - it'll be good to do that first!  Silver lining...

Friday, 21 August 2015

Amazing what you get done when...

Isn't it amazing what you get done when you're supposed to be doing something else and can't bring yourself to get stuck into that something else?

That's what it's like for me right now. Sewing is so much more fun than job hunting. So I am sewing. It is comforting to know that this activity is productive: I see a tangible result and that's very confidence building.

Most times I've been doing something else rather than sewing - perhaps I'm intimidated by it?  It could be because sewing seems so much work, or because I worry that I am not going to sew well enough... I'm not completely sure why I'm not finding it easier to knuckle down to.

- -

It is vitally important to me to get stuck into sewing projects to try and diminish my massive stash at least a little bit. So when a friend mentioned wanting to make an A-line skirt with pockets I had a project idea shoot through my head that seemed strangely fully formed.


A flared skirt with huge patch pockets on it. Love the idea, and it seemed very do-able (spoiler: I think it even was).  I preferred to draw my own pattern so I can avoid all those soul-destroying attempts at fitting and pattern adjustments. I'd rather start from scratch and know that the measurement is correct.

I established the different hip and waist measurements for front and back because I want my side seams to sit at my side and nowhere else. My front panels are a bit bigger than the back panels.

I'm glad to say that the skirt looks like a good fit even though I plain forgot to work the back darts into the pattern pieces - I can probably get away with that.


I did some lovely patch pockets with strips of light-weight interfacing ironed next to the three seams and then I found that these big pockets throw out the lovely flare of the skirt and I prefer it without them. I have some fabric left, maybe I'll use them in some other way in future.

The fabric is a funnily bouncy fibre, very thin and light-weight but surprisingly drapey. It sews up wonderfully well, I am really impressed. There are very thin and strong black warp fibres and softer silvery grey weft strands. I don't remember what the fibres are. I got it from Fabrics Galore on Lavender Hill in London (has there every been a better address for a fabric shop?). Their labels stated the fibre, I should have written it down! Or taken a photo...


I've done quite well so far. Except for attaching the lining inside out (I did French seam so I won't be tempted to re-do this). I need to hem the lining and then continue thinking about what I'll do for the closure. I attached two facings so could do buttons or hooks and eyes. I would prefer something unobtrusive.

I decided against a zip (even an invisible one) because I may want to take the skirt in a bit in future. It'll be easier to move buttons or hooks than a zip.

What do you think?