Sunday 9 September 2018

Purple and grey quilt top!

Twelve squares sewn together!

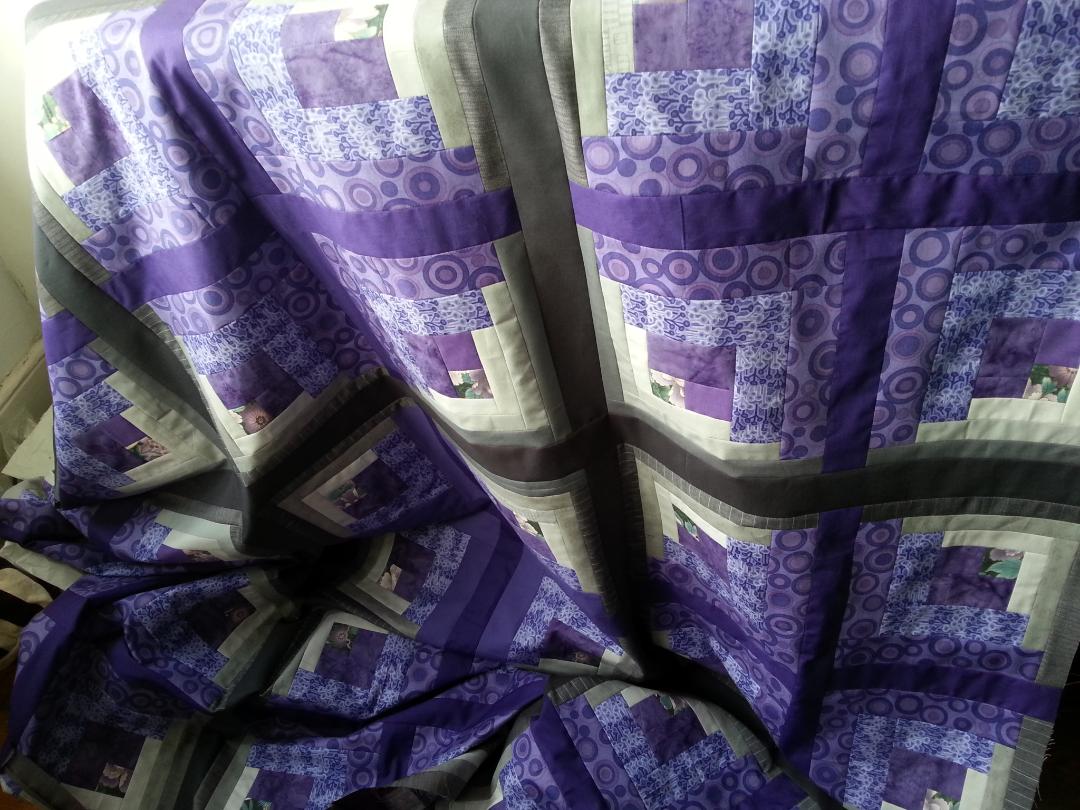
I made one of these months ago, just to see what the log cabin pattern is like when you cut one colour group in two inch strips and the other in an inch and a quarter.

I knew this would produce an uneven distribution and that the main colour would form sort of circles, but I didn't quite appreciate that they really do?! Odd, right? It was fun to see it all take shape.

I was going to do a cushion cover with this square but had so much purple fabrics that I was very keen to use up. I'm amazed that I managed to do all eleven squares! This massive amount of sewing usually takes me lots longer.

Two of these fabrics are called Pansy by Fabric Freedom (I think it was the circle one?) and another was called Victoria, also by Fabric Freedom. I bought them separately but it's no wonder that I put the two together. The small pattern was a cotton fabric from a normal fabric shop. I don't recall where I got the batik fabric.

The grey fabrics are all Kona. Years ago I bought every single grey Kona I could find so I would know what they are like... with the logical result that there are some that I don't like very much. These are them. Except for the charcoal. I like that one a lot.


I thought the purple 'circles' would dominate and sort of pop out more than the grey crosses, - I may have chosen a slightly too dark colour for the darkest grey. This is Charcoal of the Kona Solid range (from Annie's Village Haberdasher in West Hampstead. I was very glad to be able to pick out a colour in person that went with all the others). On the other hand a lighter grey would have disappeared into the neighbouring stripes...

I'll need to figure out what to do with the free motion quilting to lift out the purple areas. It will be my first time free-motioning - I'm actually rather nervous about that.


I ended up using all sorts of odd grey fabrics for the outer stripe in the quarter squares - I totally ran out of the original fat quarter. I cut up remnants of wool fabric that I had made trousers from, and even a grey shirt with a pin stripe, both of which were roughly an okay weight and their colour fit well.

I fussy-cut the center squares: the heart of the log cabin. I know these are traditionally made from a red fabric because they signify the hearth fire of the log cabin but I didn't want to use red with these colours. Not even a brown or rusty colour.

I picked a fat quarter that had purple elements. I didn't at first appreciate how much of the background green would appear in these squares but I ended up really liking that accidental contribution to the quilt.

It adds a little something without overwhelming the other elements.

I already have the wadding (in fact I bought it a good 4-5 years ago. I'm so glad to use it), now I "just" need to spread it out, sling the patchwork top on it... and err... pin it I guess?  Not forgetting the backing fabric (which is also sitting in my stash).  I haven't looked at that one yet.

But I need to spread the quilt top out so I can see if is big enough.

Hey-ho!

Sunday 20 May 2018

A pretty addition to my wardrobe


I made a garment bag for my wool skirts!

I suffer from quite a plague of moths in my room and have been able to decimate their population by using the diamond traps with the glue strips.  In my experience lavender and cedar wood do not help.  The traps cut down on the male moths but can't catch the female ones.

I made this bag out of polycotton, a cut up bed sheet if I remember correctly, that I wanted to use for toile material.  So far the moths had not gone for polycotton so I hope that this will continue.


I measured the fabric by laying the wool skirts on their hangers on top of the fabric. I found that I didn't have quite enough width of the pink polycotton fabric so I had to use strips of this lovely patterned quilting cotton.  I am really happy that this gives the whole project a great look.

Plus: I've again made a feature out of a bug - that pleases me very much!

I could sew the invisible zip to the cotton strips first which made handling the whole thing easier.  I overcast the raw edges after sewing this together.  Luckily it was really easy to turn inside out through the zip opening.

I left the sewing threads long and pulled these ends onto the right side with the help of a hand sewing needle.  You get great sharp corner with very little effort when you just pull on those threads to pop out the corners.  No poking or pushing required!


I re-inforced the central seam above the zip and then only poked a little bit of it open so that the hanger fits through.  I am fairly certain that no cheeky moth can crawl through.


To make the garment bag that little bit safer I also included a piece of anti-moth paper - though I am not at all sure that these work.  Still, I had some left so why not.

That's two wool skirts that are at least zipped into a bag that moths would have to eat through. I hope they don't.

Saturday 17 March 2018

Saw a fabric, couldn't resist it, bought it, and ended up disappointed because it doesn't at all look like I imagined.

The colours are much paler in real life, more washed out

I knew that this is a stretch fabric, but I didn't think it was as thick as it is. It is basically sweatshirt material.

The colours are nice: I like them a lot, but they are printed on top of the white fabric - very much like digital print fabric.  Which this must be as well, it's just that the pattern doesn't look as sharp as motifs I associate with digital prints.

If only this fabric was something like a thin viscose, I would love that fabric!

Well...

I have quite a bulky bunch of fabric because the material is so thick. I don't want to shove into my stash because I don't have the space. So I made myself start the project - I am making a top that looks much more like a tunic on me.

It is rather loose and not fitted enough and I'm not sure what to do with it...  What a disappointment.

To be updated!

Sunday 4 February 2018

Cardigan

Another old draft that I hadn't posted yet - the reason why completely escapes me. Here goes:

As of December 2016:

I am improvising a cardigan from a pattern I saw in one of the Brooklyn Tweed pattern collection books.  It is a while back so I don't remember which one.  I liked the colour and general impression of the cardigan but I didn't think the actual design lines would look good on me: the back shoulder and waist area was strange. So I made my version up as I went along.


I very much liked the idea of a pattern at the front edges (don't know if the original was reversible, as in the same on the right and on the wrong side). I wanted one that could flip over, and still look good.  Even if the pattern wasn't the exact same thing on both sides.

I had seen a cabled pattern on Ravelry called 'Lucky Ribs cable cowl'. It looks pretty easy to knit but I couldn't quite figure it out myself. So I searched "the internet machine" and found it. I even found the website again: it is called Cable with Segments stitch on a website called Craft Elf.

The stitch pattern isn't complicated: it is a K2 P2 ribbing for however many rows you want (I think I went with 12 rows before the first twist row, a bit more below) - and then the pattern said to twist four stitches containing P1 K2 P1 with the next group of four stitches that are: P1 K2 P1.

The reverse of this then doesn't looks quite the same as the right side appearance. The 'central' stiches are just two knit stitches wide, whereas on the right side it is four knit stitches.

For some reason I got that "wrong".  I twisted groups of K2 P2 with K2 P2. Guess what the reverse looks like?  Exactly the same!

I lucked into a variation of this that is truly reversible. How lucky is that?

I am so pleased that by getting a part of the instructions wrong I ended up with a version that I like a lot better. So of course I'm sticking with it!

The only thing I have to watch out for is that if I twist K2 P2 with the next four stitches, then I need to mirror that at the other edge: I need to twist groups of four stitches of P2 K2 with P2 K2. Otherwise the edge doesn't look the same and one side will look really off.

I love the way this looks

This is the back: to avoid the ballooning out blouson effect and get the cardigan to mold a bit more to my swayback, I decided to cinch this in at the small of my back. We'll see how that goes.


The original had a weird tapering line at the back of the top of arms. I didn't like the way it looks and I don't understand the function. So I am going to go straight up. I will make sure to strengthen the shoulder seams so the cardigan doesn't pull the sleeves down.


My problem now is: how do I fit sleeves into armholes that have K2, P2 ribbing at their edge? You can't see them properly in the above photo because the circular needle is pulling the back down - the armholes are to the immediate right and left of the front pieces.

Should I knit them to normal dimensions (in stockinette, not in ribbing) and see where I need to place stitches to keep the ribbing 'ribbed'?  Or what?

Maybe I'm making more of a problem out of this than it'll turn out to be. I should just go for it I think.


This photo shows the cardigan body folded up so you can see the front edges better. The smooth piece on the left is the first sleeve. In stocking stitch, not ribbed.

This is how far I got. Fingers crossed that I'll pick this back up soon. I think I am making more of the sewing together of sleeves and body than it should be. I'll need to seize my courage!

(To be updated. I managed to finish this in late 2017!  I just need photos and then I can write the update)

Sunday 7 January 2018

Grey lace blob - progress!

So I was knitting this in January last year - I might as well blog about it, finally! Even though it is now way after the fact. Oh well.


I am getting on very well with my grey lace project:

I've got the flower done, but I can't believe how much there is still left to do:


I thought this would be finished when I reached the part that shows just a top right hand corner under the pink Post-it. My first photocopy didn't cover the whole chart, this second copy captures the top.

Once I get to the top of this third row of flowers, then I should be done!


And would you believe it: even though I had a full two skeins of this Fyberspates lace yarn, I still ran out. Gah. The colour name turns out to be nothing like steel, or grey or silver and whatever I had fondly imagined, nope, it is water. 'Water'. Oh. Okay.

I bought the two skeins at Alexandra Palace at least three years ago, probably longer. I couldn't get the same dye lot anywhere. So I had to go with a contrast.

I chose the dark blue colour which is called 'midnight'.

Here is the final project photo:


And it is a really, really big size. Almost too large to wear as a shawl - it's more of a table cloth. Hm. Not much use to me right now but at least I had lots of fun knitting this.