Monday, 3 May 2021

A few recent projects

Here are some items I got done in the last year
They are both the same octagonal bag. I made another two, I must check where I put their photos.
A skirt I shortened from a dress WIP that didn't work out:
There are more, I just need to take proper photographs. But I have been busy sewing.

Sunday, 22 March 2020

Before and after... the moths got into my new shawl

Thankfully these before and after pictures tell a nice story. I fixed those holes made by the little blighters. Amazing what a bit more time at home can do.

This is before with all the damaged areas marked by a pink thread:


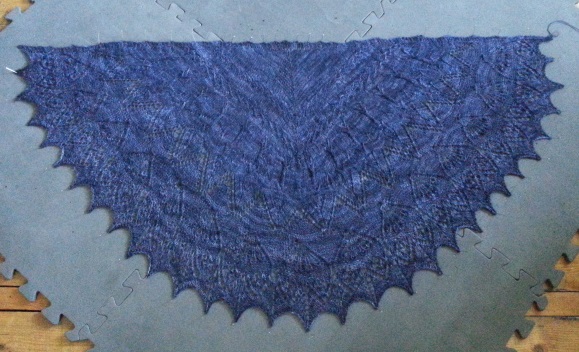
And this is after I fixed them: 


I'm very glad I was able to get to it so quickly. Within one week.

I only discovered the damage those blasted moths did when I came to block the shawl in the last week.

I thought that the pattern for this was called Vintage.. something. Turns out its name is actually Semco Fairy Knitting Design Number 9, very fetching! Here's the link to the Ravelry page. I seem to remember that the instructions were written out, row by row. I don't usually like those patterns because I find it cumbersome to have to read out what it says. I usually draw in pencil lines to set off the different elements from each other and make it easier to find my place again.

I prefer a good chart. You can see what stitches build on stitches in rows below and you can often tell what the motifs are going to look like. I find them easy to read because I have a very visual approach to things in general.

This has quite a large number of rows so when I started this I decided that it was going to be the project that would keep me entertained for the however many years it would take to get through it if I only picked it up every so often. I had a look: I started this in 2010, so it's been almost ten years.

The actual knit itself did not take years, but I only picked it up here and there. I should have known that the knitting part of this would go relatively fast: I know what I'm like with lace knitting. I get absorbed! I get obsessed with trying to find out what the next row is like. That's what I love about lace knitting: pretty much every row is different from the one below. There's always something a bit different to keep it interesting. It took me a number of months to knit it, but the edge loops took a long time too. I had to rest it often and for a long time in between. My Ravelry notes say that I did the first version of the edge treatment in 2014 and then those loathed crochet loops in 2016. I really drew this one out...

I do like wearing these over-sized doilies as shawls. I fold them in half and sling it over my shoulders. Very nice'n'cosy for the back of my neck that gets painful if cold or in a draft. My shawls are a well-being necessity for me.

This yarn is very gorgeous: soft, scrumptious, with that sort of plumb, satisfying feel to it. The moths must have thought so too.  I can't believe they got into the zipped freezer bag that I stored this in as a WIP. I found a small hole where they could have chewed their way out. Who knows how they got in. It was very upsetting when I discovered the damage. I was even considering ripping this down and starting over.

The one thing that stopped from doing that was the hundreds of crochet chain loops that form the edge. I nearly lost the will to live over them. I really hate doing them. They take so very long and are so annoying to do. Again and again the crochet hook will slip out of the loop and I have to carefully spear the thing in the right place to avoid twisting or splitting the yarn. That just invites breaks and is a big no-no.

Still I got there. First hundreds of crochet chains, and then a multitude of moth holes all fixed. I think I did a pretty good job on the fixes. I didn't pull the thread tight enough in a few places so you can still see bigger holes, but I'm not losing sleep over that. Some of the fixes are almost invisible, other places I can still find. Oh well. Mustn't have presumptions of perfection.

This is one area that doesn't look too bad. Just a bit of unevenness left:


PS: The actual colour is a bit more aubergine rather than this violet. Shame that cameras don't always render the colour as the right shade.

I'll make sure to double bag the shawl and I've shaken it very well!

Saturday, 31 August 2019

Follow my Arrow shawl

Looks like I never posted about my pretty grey shawl:


This is from the Follow My Arrow 2 pattern by Ysolda Teague.  It offers two patterns for each of five sections of this shawl. So there are 25 different ways of knitting this.

I really enjoyed it!

I loved the edging a lot - this is what attracted my attention to this pattern in the first place. That one was a must. I think that the other four sections go realy well with the edging, it was almost like they picked themselves and I just had to listen to what they were telling me: pick me, pick me!


Monday, 26 August 2019

The owls mittens!

I forgot to post this. It happens.

Written at end of October 2017 when I didn't want to post this too early in case the recipient saw this before Christmas, and then...  Oh well.

~ ~ ~

Shhh, Christmas is not far away so let's not tell secrets...

Here is my current knitting project and I am really pleased about the colourwork:


I also discovered the photo editor Polarr, it can do so much more than I realised photo editors can do. It was a blessing in disguise that the default programme on this Windows 10 machine didn't even do brightening let alone sharpening. I discovered a new passion!

I can see myself slaving away over photos from now on. I just hope I figure out how to best use it. At the moment it's a case of sliding around any which lever to see what it does.

Anyway...

The ribbing looks really nice: the purl stitches are in black and the knit stitches in aubergine. I also like the pattern on the other side, and I love the owls.

It was a relatively quick project though not quite as quick as I would have liked. Still it was quick enough for me to start the second pair of mittens with fairly high confidence that I can get them done by Christmas. Also a present.

What I don't like about these: my sister only has small hands and the thumb placement is too low. They came out massively too long when the ribbing could have sat a bit lower. Darn. If she likes them I'll just have to knit them a second time.

And the other side as well as the mini owl on the thumb!

Sunday, 28 July 2019

Getting to a super-duper adjusted pattern

My first toile

Warning: this got stuck in my Drafts for too long. I'm posting it now because I want to refer to this project. So here goes, you've been warned!

I did a one-on-one fitting session with a lovely sewing teacher in February 2018 (Fit2Sew). Mandy uses the Palmer Pletsch method of first tissue fitting followed by adjustments to the paper pattern.

It was fantastic!

I learned so much and I am so grateful.

My FBA was okay with darted tops but I didn't know the last step for a princess line pattern: you make the FBA adjustment only in the side piece (got it) and slashing towards the centre you close the dart you opened. The slash allows more space on the side towards the centre front where it is needed. Makes total sense.  Now I really don't know what I was trying to do instead. This shall remain a mystery.

I also found that my shape requires a horizontal slash and spread for my rounded upper back instead of the vertical adjustment attempts that I was monkeying around with (yikes!). At least I had a fairly good idea how to do the swayback adjustment but it was still pretty great to go over this adjustment...

Best of all, because I had no idea: I need to rotate the shoulder seam forward by a good centimentre which is completely obvious when it finally dawned on me that carrying my shoulders forward has a heck of a lot to do with my rounded upper back. Oh right! Yes those two things do seem connected, don't they?  I don't seem capable of an upright posture where you keep your shoulders back - just wishing for something doesn't make it true so I better go with what I'm dealing with.
Yep: there needs to be more fabric in the back pattern piece at the shoulder and a little less in front - and the answer is: Rotate shoulder seam forward!  Well darn it, that was obvious!  Better late than never methinks.

The session really brought home a decisive principle of pattern drafting.

Whenever you make any adjustment: you have to look at whether this pattern piece gets stitched to another. When you make one edge longer, the joining piece will be too short. You may be able to ease some pieces in, sleeves into armholes are a good example, but that only works for small differences and with some fabrics. It is better to adjust the edge of the other piece as well. They won't sew up well if not!  Whatever change you make on one side of a seam you need to make on the other side too. Undeniable logic.

McCall's Palmer Pletsch pattern M7352

So I have my lovely flare dress pattern all adjusted (I hadn't consciously planned to bring the Palmer Pletsch pattern M7352 for this class, but I had it so that felt like divine sewing intervention!).

After soaking up so much information on all the different adjustments I sank onto the sofa at home utterly exhausted - so knackered that I was only able to cut out the main pieces in a turquoise stash fabric the following weekend, and I've only got round to sewing it up this week (remember, this was all back in 2018).

I still need to do the neck facing, the hem and also cut out and sew in the sleeves. I want to do short sleeves (this cotton fabric wouldn't be great for long sleeves) but I haven't completely made my mind up if I'll go with the pattern piece from this design or do something else.

I considered a tulip sleeve that I fancied for ages but this stiff fabric isn't ideal for overlapped layers.  I could also slash and spread the piece for a flutter-type sleeve or one that could have an inverted pleat at the lower edge. May not be good ideas, I need to take the fabric into account.

I have yet another idea: a split short sleeve with the normal seam at the underarm position but also slashed vertically in half (adding seam allowances) for an open slit that runs from the shoulder seam at the top of the sleeve all the way down to the hem. Decide later if I want to leave the two pieces loose or sew together at the very bottom. I came up with this idea because I think it would make the sleeves easier to iron.  I might go for that.

It would be a nice challenge and if it doesn't work out I could still swap it with a standard sleeve. I have enough fabric for two lots of short sleeves.

Watch this space!


PS: The split sleeve idea didn't turn out well. Wrong fabric. Blog post to come.

Sunday, 6 January 2019

Latest projects

How long didn't I blog and how much did I do?  Quite a bit.

I don't have photos of everything so just a small selection:


I really enjoyed making these socks, in a leaf pattern - great knit. I gave them away, the colour is a little bit bright even for me.


I seem to be the only person who knitted these socks. The original ones were done by the designer in blue and her theme was Heatwave. I thought my colour fit very well into that!

The only photo of the blue socks was a little blurry, so perhaps people couldn't see how fantastic the pattern is? It looked complicated, so I wanted to knit it.

The pattern is a bit crazy - it gets you to knit two stiches together that feel like they shouldn't. In fact, the stitch pattern isn't at all intuitive, I had to refer back to the pattern all the time. Which doesn't happen very often to me.

I thoroughly enjoyed the challenge of knitting these and I am delighted with the result! They look gorgeous and I love wearing them.

I called them Cereza socks after the colour.


I loved making these Rock'n'Roll mittens as well. I enjoy colourwork and don't do it often enough. I changed the pattern on the inside of the mittens and didn't want a skull at the top of the guitar either. I really don't enjoy them as a motif.

The pattern is from the Big Book of knitted mittens.

More to come when I can dig up photos.

Sunday, 9 September 2018

Purple and grey quilt top!

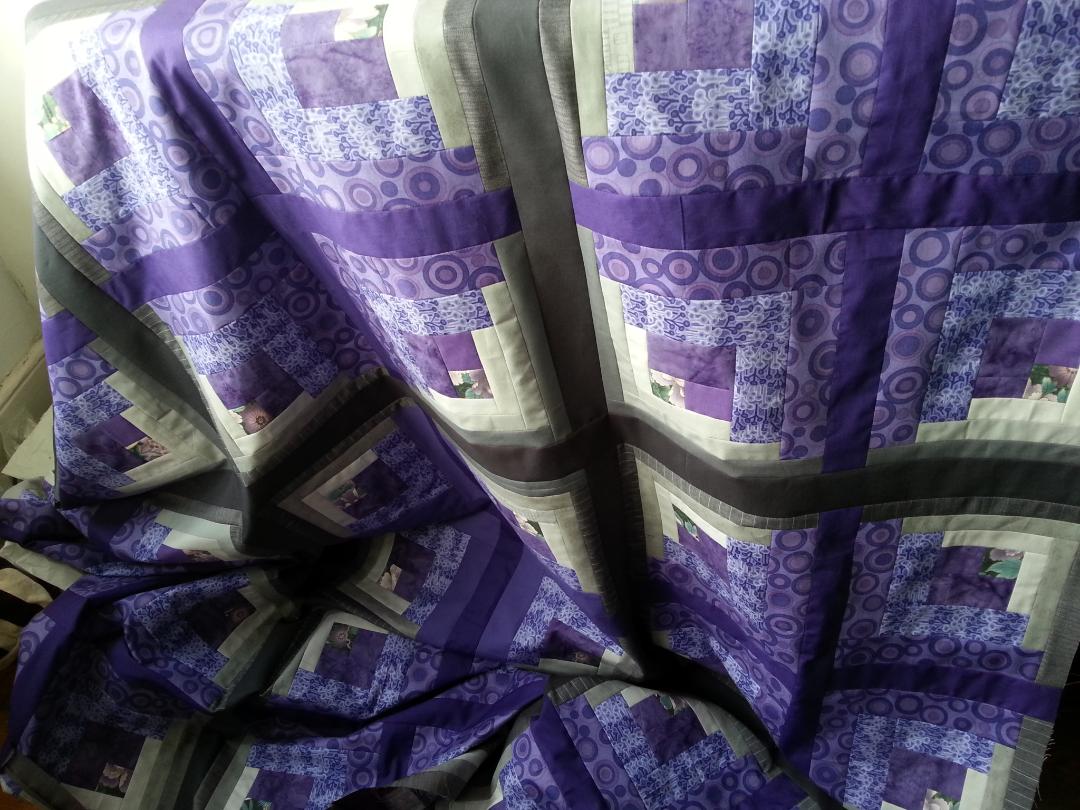
Twelve squares sewn together!

I made one of these months ago, just to see what the log cabin pattern is like when you cut one colour group in two inch strips and the other in an inch and a quarter.

I knew this would produce an uneven distribution and that the main colour would form sort of circles, but I didn't quite appreciate that they really do?! Odd, right? It was fun to see it all take shape.

I was going to do a cushion cover with this square but had so much purple fabrics that I was very keen to use up. I'm amazed that I managed to do all eleven squares! This massive amount of sewing usually takes me lots longer.

Two of these fabrics are called Pansy by Fabric Freedom (I think it was the circle one?) and another was called Victoria, also by Fabric Freedom. I bought them separately but it's no wonder that I put the two together. The small pattern was a cotton fabric from a normal fabric shop. I don't recall where I got the batik fabric.

The grey fabrics are all Kona. Years ago I bought every single grey Kona I could find so I would know what they are like... with the logical result that there are some that I don't like very much. These are them. Except for the charcoal. I like that one a lot.


I thought the purple 'circles' would dominate and sort of pop out more than the grey crosses, - I may have chosen a slightly too dark colour for the darkest grey. This is Charcoal of the Kona Solid range (from Annie's Village Haberdasher in West Hampstead. I was very glad to be able to pick out a colour in person that went with all the others). On the other hand a lighter grey would have disappeared into the neighbouring stripes...

I'll need to figure out what to do with the free motion quilting to lift out the purple areas. It will be my first time free-motioning - I'm actually rather nervous about that.


I ended up using all sorts of odd grey fabrics for the outer stripe in the quarter squares - I totally ran out of the original fat quarter. I cut up remnants of wool fabric that I had made trousers from, and even a grey shirt with a pin stripe, both of which were roughly an okay weight and their colour fit well.

I fussy-cut the center squares: the heart of the log cabin. I know these are traditionally made from a red fabric because they signify the hearth fire of the log cabin but I didn't want to use red with these colours. Not even a brown or rusty colour.

I picked a fat quarter that had purple elements. I didn't at first appreciate how much of the background green would appear in these squares but I ended up really liking that accidental contribution to the quilt.

It adds a little something without overwhelming the other elements.

I already have the wadding (in fact I bought it a good 4-5 years ago. I'm so glad to use it), now I "just" need to spread it out, sling the patchwork top on it... and err... pin it I guess?  Not forgetting the backing fabric (which is also sitting in my stash).  I haven't looked at that one yet.

But I need to spread the quilt top out so I can see if is big enough.

Hey-ho!

Sunday, 20 May 2018

A pretty addition to my wardrobe


I made a garment bag for my wool skirts!

I suffer from quite a plague of moths in my room and have been able to decimate their population by using the diamond traps with the glue strips.  In my experience lavender and cedar wood do not help.  The traps cut down on the male moths but can't catch the female ones.

I made this bag out of polycotton, a cut up bed sheet if I remember correctly, that I wanted to use for toile material.  So far the moths had not gone for polycotton so I hope that this will continue.


I measured the fabric by laying the wool skirts on their hangers on top of the fabric. I found that I didn't have quite enough width of the pink polycotton fabric so I had to use strips of this lovely patterned quilting cotton.  I am really happy that this gives the whole project a great look.

Plus: I've again made a feature out of a bug - that pleases me very much!

I could sew the invisible zip to the cotton strips first which made handling the whole thing easier.  I overcast the raw edges after sewing this together.  Luckily it was really easy to turn inside out through the zip opening.

I left the sewing threads long and pulled these ends onto the right side with the help of a hand sewing needle.  You get great sharp corner with very little effort when you just pull on those threads to pop out the corners.  No poking or pushing required!


I re-inforced the central seam above the zip and then only poked a little bit of it open so that the hanger fits through.  I am fairly certain that no cheeky moth can crawl through.


To make the garment bag that little bit safer I also included a piece of anti-moth paper - though I am not at all sure that these work.  Still, I had some left so why not.

That's two wool skirts that are at least zipped into a bag that moths would have to eat through. I hope they don't.

Saturday, 17 March 2018

Saw a fabric, couldn't resist it, bought it, and ended up disappointed because it doesn't at all look like I imagined.

The colours are much paler in real life, more washed out

I knew that this is a stretch fabric, but I didn't think it was as thick as it is. It is basically sweatshirt material.

The colours are nice: I like them a lot, but they are printed on top of the white fabric - very much like digital print fabric.  Which this must be as well, it's just that the pattern doesn't look as sharp as motifs I associate with digital prints.

If only this fabric was something like a thin viscose, I would love that fabric!

Well...

I have quite a bulky bunch of fabric because the material is so thick. I don't want to shove into my stash because I don't have the space. So I made myself start the project - I am making a top that looks much more like a tunic on me.

It is rather loose and not fitted enough and I'm not sure what to do with it...  What a disappointment.

To be updated!

Sunday, 4 February 2018

Cardigan

Another old draft that I hadn't posted yet - the reason why completely escapes me. Here goes:

As of December 2016:

I am improvising a cardigan from a pattern I saw in one of the Brooklyn Tweed pattern collection books.  It is a while back so I don't remember which one.  I liked the colour and general impression of the cardigan but I didn't think the actual design lines would look good on me: the back shoulder and waist area was strange. So I made my version up as I went along.


I very much liked the idea of a pattern at the front edges (don't know if the original was reversible, as in the same on the right and on the wrong side). I wanted one that could flip over, and still look good.  Even if the pattern wasn't the exact same thing on both sides.

I had seen a cabled pattern on Ravelry called 'Lucky Ribs cable cowl'. It looks pretty easy to knit but I couldn't quite figure it out myself. So I searched "the internet machine" and found it. I even found the website again: it is called Cable with Segments stitch on a website called Craft Elf.

The stitch pattern isn't complicated: it is a K2 P2 ribbing for however many rows you want (I think I went with 12 rows before the first twist row, a bit more below) - and then the pattern said to twist four stitches containing P1 K2 P1 with the next group of four stitches that are: P1 K2 P1.

The reverse of this then doesn't looks quite the same as the right side appearance. The 'central' stiches are just two knit stitches wide, whereas on the right side it is four knit stitches.

For some reason I got that "wrong".  I twisted groups of K2 P2 with K2 P2. Guess what the reverse looks like?  Exactly the same!

I lucked into a variation of this that is truly reversible. How lucky is that?

I am so pleased that by getting a part of the instructions wrong I ended up with a version that I like a lot better. So of course I'm sticking with it!

The only thing I have to watch out for is that if I twist K2 P2 with the next four stitches, then I need to mirror that at the other edge: I need to twist groups of four stitches of P2 K2 with P2 K2. Otherwise the edge doesn't look the same and one side will look really off.

I love the way this looks

This is the back: to avoid the ballooning out blouson effect and get the cardigan to mold a bit more to my swayback, I decided to cinch this in at the small of my back. We'll see how that goes.


The original had a weird tapering line at the back of the top of arms. I didn't like the way it looks and I don't understand the function. So I am going to go straight up. I will make sure to strengthen the shoulder seams so the cardigan doesn't pull the sleeves down.


My problem now is: how do I fit sleeves into armholes that have K2, P2 ribbing at their edge? You can't see them properly in the above photo because the circular needle is pulling the back down - the armholes are to the immediate right and left of the front pieces.

Should I knit them to normal dimensions (in stockinette, not in ribbing) and see where I need to place stitches to keep the ribbing 'ribbed'?  Or what?

Maybe I'm making more of a problem out of this than it'll turn out to be. I should just go for it I think.


This photo shows the cardigan body folded up so you can see the front edges better. The smooth piece on the left is the first sleeve. In stocking stitch, not ribbed.

This is how far I got. Fingers crossed that I'll pick this back up soon. I think I am making more of the sewing together of sleeves and body than it should be. I'll need to seize my courage!

(To be updated. I managed to finish this in late 2017!  I just need photos and then I can write the update)

Sunday, 7 January 2018

Grey lace blob - progress!

So I was knitting this in January last year - I might as well blog about it, finally! Even though it is now way after the fact. Oh well.


I am getting on very well with my grey lace project:

I've got the flower done, but I can't believe how much there is still left to do:


I thought this would be finished when I reached the part that shows just a top right hand corner under the pink Post-it. My first photocopy didn't cover the whole chart, this second copy captures the top.

Once I get to the top of this third row of flowers, then I should be done!


And would you believe it: even though I had a full two skeins of this Fyberspates lace yarn, I still ran out. Gah. The colour name turns out to be nothing like steel, or grey or silver and whatever I had fondly imagined, nope, it is water. 'Water'. Oh. Okay.

I bought the two skeins at Alexandra Palace at least three years ago, probably longer. I couldn't get the same dye lot anywhere. So I had to go with a contrast.

I chose the dark blue colour which is called 'midnight'.

Here is the final project photo:


And it is a really, really big size. Almost too large to wear as a shawl - it's more of a table cloth. Hm. Not much use to me right now but at least I had lots of fun knitting this.

Saturday, 11 November 2017

I sewed a little more

[Oh darn: this draft is from some time earlier in the year. Oops, forgot]

I have made a bit more progress on a couple of things. But nothing seems to get done easily, let alone quickly.

Issues with two skirts:

My black and white wool skirt still needs the inside corner of the vent sorted out, I'm not happy that I haven't done that yet. And I thought I was done with my second self-drafted wool skirt, the one in the heathery pinkish-red.  It isn't!  Sneef!

I had blind hemmed the bottom of the wool fabric hem to make sure it would lie flat. Then I hand sewed the lining to it. Well guess what: now the lining pulls at the skirt in plenty of places and I basically have to re-do that.

Or pull the blind hemming back out and I'd have to un-do and re-do at least some of the sewing on the lining for that too. It's not exactly a win-win situation - I'll have to do quite a bit of work either way. I do have the feeling that the blind hemming could continue to be a problem. Bother!

Update: I finally got started on this and it didn't even take long. Does it ever? You just build up this problem in your head and it seems insurmountable!  I put lots of pins into place and released the lining - sewing it back was the work of a half hour at most.

Here is the problem of the black and white skirt:


Folding the hem the wrong way at the back vent looks terrible!  Really amateurish.

Here is the inside:


I did plumb up the open bit a little so it's easier to see in a photo. But the fabric might have done that by inside when wearing so this definitely couldn't stay the way it was.

Another update: I finally got over the "but I've already hand-sewn it on!" feeling and re-did it. Again, it didn't take nearly as long as anticipated.


I don't like the asymetric jersey top in the Brushstrokes pattern, I can't see myself wear it because it doesn't look very nice on me. I am losing weight at the moment because I'm counting calories but it doesn't seem to affect my waist line in the slightest so the problem with this top will continue. Plus I'm bound to put weight back on at some point.

I need to get a photo taken of me wearing this to illustrate the issue:


Also: it doesn't help that the lining now turns towards the outside which you can see in the badly fuzzy photo on the left. Grumble.

- - -

I long wanted to make a dress with a waist seam in the shape of an inverted V or chevron. This shape might be called 'swallow wings'.  I didn't have the right sort of pattern and thought I could draw this myself, but I never did.

I found New Look 6183 which has this waist seam but it also has some rouching along the top of the front side panels where they meet the centre front panel. I wasn't keen on those but I tried the original side panel piece when I tried out my toile, and then folded the side panel piece to suppress some of the excessive length so I could sew this other side with less gathering.

I liked the lesser amount better because I feel that it won't show up my big tummy as much as the original rouching would.  Not sure if that's wishful thinking.


There are no bust darts: the top pieces are gathered under each bust. This is a style I have not tried before so it'll be interesting to evaluate.

I had set aside a cheap viscose fabric that I got in a closing down sale. This is a fabric that irons wonderfully well and drapes quite well too.  It is a fabric that's quite light though and the flimsiness means that this is slightly difficult to sew: both my overlocking and the straight stitches wrinkle up and make the seams pull.

A good press makes this a bit better but doesn't fix it altogether.  Rough skin on my hands also gets stuck on this fabric and I find that I have to drag it over my ironing board because it clings to it as well. I've never encountered this problem before!

These problems mean that I got rather disenchanted with carrying on with this dress and feel that I need to try the pattern in another fabric. It would be interesting to see if which gathering I prefer in a less light fabric.


So glad I managed to sort out the vent on the black and white skirt, hopefully I'm making progress with other things too. Fingers crossed.

Onwards and upwards!

Sunday, 29 October 2017

Spiral flounces!

Oh dear, I haven't posted in too long. I have been crafting but just not blogged about it. Still, there's lots ot catch up on then!

Just to show you what I'm working on right now, i.e. a little taster:

Spiral flounces!


I already pinned the two layers together. The outside curve is not perfect in so far as the distance between them meanders in and out rather a bit but I don't care.

I reckon they're pretty good for a first attempt. And it wasn't even as difficult as I feared:


This is what spiral ruffles look like when you straighten them out:


The top part will follow the curve of the neckline to begin with, starting from the shoulder yoke:


And the bottom part will then run alongside the blouse's button band:


I wasn't able to straighten this out completely for the photo, but you get the idea.

This is traced off the Oxfam blouse that I bought and liked a lot, expect for its pasty light blue colour and the fact that it is rather baggy under the arms. That the bust darts didn't point in quite the right direction didn't help either - all issues I can solve in a traced off pattern!

I will re-visit the paper pattern pieces and check about the outside curve. I hadn't thought to superimpose them to check how they would look one on top of the other. Now that I think about it, that would have been the obvious course of action! But you live and you learn.

I'll adjust the pattern pieces for the event that I want to make this again in another fabric.

I must say that I really adore the shapes that this spiral ruffles make. I wonder how big you could go? Must try that.


Monday, 20 March 2017

One red top: modified!

I am so very pleased!  I altered a red top that I had for some years and I still love, love, love the colour, but the fit is much too tight over the bust and I got bored with the overall look.

My good friend Tash unwittingly gave me a great design idea.  She was going to use a scallop hem tutorial and this made me think about what other shapes you could do.

This top makes a great project to try out my shaped hem idea. If it works then great, but if it doesn't then I can either chop off the hem and straighten it back out, or just let this go.

It worked out well!

This is what I started with:


It was only when I looked that I realised that I already had to do a repair job on the top of the side seams.  I hadn't worn this in a while so I didn't recall that there were holes, - and my hand sewing wasn't all that great either:


I machine basted the hem to turn out and press (I pressed to the inside first but realised that this wouldn't work. Lucky escape!).  Then I drew the pattern on and started to v-e-r-y slowly stitch it. It wasn't as easy as I expected:


My shape is a bit overly complex.  But I like it a lot.

I then turned this inside out and prodded and poked until all the little corners and peaks looked okay.  Again not as easy as I blithely assumed:  my scissor tip method did end in a couple of frayed tread ends poking through.  I ruthlessly cut those off.  This isn't a high value item - I just want to enjoy it while it lasts.


Then I edge-stitched this to retain the shape when I wash this next time:

No idea why this is upside down

I also ripped the long sleeves out and inserts wedge shaped gussets into the top of the side seams. This way I could make the top big enough to fit at the bust, and it also had the added advantage of getting rid of those pesky holes. Win-win!

I scooped the armholes out a bit to make a pleasing shape.  That ended up being a bit of a problem: the armholes probably gaped before but this emphasises it.  So I sewed bust darts in, longer ones at first but these looked awful, then shorter ones.  I am still not over the moon with this area, but I think top is wearable.

Here it is:


I think this is a successful project that I hope to get lots of wear out of in the summer!

Thank you Tash for the inspiration!