Friday 30 April 2010

Knitting & Crochet Blog Week - Friday: Location, Location, Location


I used to knit only at home, at friends' places and back in those days, my teenage years, when we were meeting up weekly for 'youth group' (don't know if there is a better translation).  My friends were instrumental in my starting to knit (peer pressure! Everything at 15 is cool as long as your friends are into it) - so sitting in their midst while crafting away was really, really cool. Made me feel good.
I only just realised that this must be one of the reason why I enjoy going to knitting groups so much these days! Seeing as it takes me right back...

I really enjoy knitting at knitting groups - I go to a weekly one most weeks and have started going to a monthly group in London's Notting Hill area, the Last Wednesday in the Month Knitting Club. The venue (The Travel Bookshop) has a lovely, relaxing atmosphere with the added bonus of being able to look through their stock, and you get a cup of coffee too!

Since the knitting groups, I started knitting in public too. My usual journey into work on the tube can be very boring. I can only make myself read Metro so many times and reading a paper is never any real competition if you could be knitting instead! It does depend on how crowded the train is. Evenings (particularly after knitting group) is best and those mornings when I managed to leave the house those vital 5-10 minutes earlier than normal. If you had told me not all that long ago that I might voluntarily get myself out of the house earlier than I absolutely have to, I would have called you more than crazy...

(PS: I also knit at work at lunchtime, my colleagues no longer quirk an eyebrow, they're way too used to see me with yet another knitting project.)

But mainly I like cafes and places like that - I am in the process of trying to find out which particular ones are best for spending an hour or two to indulge without having to sit at home in the same four walls. The cafes in the book shops on Charing Cross Road or Trafalgar Square (Borders and Waterstone's, I think) are not bad, but they do get awfully crowded on a weekday evening after work. Not completely great fun as such. I like the cafe in the big Waterstone's on Piccadilly, but it is located in the basement and much nicer when it's nasty weather outside (then it's cosy). Now that it is getting much sunnier and warmer, I will probably try to find places where you can at least see what it's like outside. Maybe on the South Bank at or near the Royal Festival Hall. I will also try the plaza outside the British Library, they have a coffee shop right out front and some seating on the plaza.


There must be other places - any good ideas? Let me know in the comments, I'd love some suggestions!

Thursday 29 April 2010

Knitting & Crochet Blog Week - Thursday: A New Skill


Should I make this blog post about steeking? It does seem to offer itself very neatly but I did blog quite a bit about the rose coloured Elizabeth Zimmermann cardigan I made (using the pattern for The Green Sweater).

I think I should write about something else.


This is not too much 'something else' because I will also be steeking the front opening (ahem, forgot about the armhole steeking, I'll be doing those too). I wanted to make a colourwork cardigan but very quickly realised that knitting with two colours is very confusing when you need to purl - the strands of yarn keep getting in the way when turning the work to the wrong side.

That proved too frustrating an obstacle so I ripped back and decided to knit this in the round instead. Much easier! Now I've got to shoulder height but I hadn't known enough to allow for vertical steek lines. Thankfully I have enough stitches to work steeks anyway - I've kept on knitting this with hardly a change in the number of stitches on my needles! I think I should even be able to work a steeked seamline on a curve. To achieve a proper underarm shaping.

This is how far I got:


I could be wrong about the curved steeking, but by heck! I am going to try. Nothing ventured nothing gained. And if nothing is lost then you haven't learnt a thing either. The risk is well worth it. At worst I'll have to re-knit the section from the underarms up and have wasted some yarn. It is Diploma Gold 4 ply which is still readily available. I've even got plenty of yarn at home, I should be fine even if I have to re-knit a quarter of this.

The colour work pattern is from a German knitting magazine I bought over there last winter. I think the top was just called Wave Crest patterned cardigan (Wellenmusterpulli), I need to check.  I like the three rows when two colours are being used but I felt that only two rows of the single colour in between those sections was too short and way too much work - so I increased them to four rows. I think this makes the pattern look more even and not quite as busy. I don't follow the instructions for the garment itself, I am just using the colour work pattern.

I am not sure yet how to make the sleeves so that the pattern looks okay at the top of the arm where it meets the front and back. I may have to play around with this quite a bit. I'll see.

Wednesday 28 April 2010

Knitting & Crochet Blog Week - Wednesday: One Great Knitter


This blog entry carries straight on from my post yesterday.

The One Great Knitter who inspires me is Elizabeth Zimmermann (there is lots of stuff on the Internet, I like this article remembering her). I have her Knitter's Almanac and I enjoy the mix of very different projects.


I have made the 'Hurry Up/Last Minute' sweater, the December project. Because it is to be knitted at 10 stitches for 10cm it is meant to be a really quick project.  I needed 12mm needles! Knitting this became a bit of a weight lifting exercise too, even on circular.

I cast on on 31 December lat year. Imagine my amazement when I was done three days later! Well, make that three and a half days to be scrupulously honest. But it was very quick. I love the way the wishbone pattern works and gives your torso a lovely shape even if you are a bit bustier. It is a great pattern! I would make this again as well but would start to decrease slightly earlier for the shoulders because the Wendy Viva yarn I used stretches quite a bit row-wise (if that makes sense) and therefore the sweater hangs just a little heavy from the shoulders. Decreasing a little earlier (3-4 rows only?) and then over a few more rows should easily take care of the problem.


What I love about Elizabeth Zimmermann's way of writing is her voice that you can hear in her books: I love it that she writes about how she developed her patterns, some stuff about her life, and that she then gives her 'pithy directions' to follow if you do not wish to re-read the longer description. She coined the phrase 'to unvent' something which I believe stands for not actually inventing a thing because it was probably invented by someone else long ago (nothing truly new under the sun) but that she unvented it: as if unearthed and re-discovered. It is an interesting phrase.


I also have her 'Knitting without Tears' but have not studied it in detail yet - the few things I caught sight of, when glancing through it, are all concepts and techniques I know about. It would have been useful to have had this book when I picked up knitting again late last year - after a break that possibly lasted about ten years or so. Those ten years back I had put down the project at the time, just for a bit, and didn't come back to until February this year. The result was the Black and White top I blogged about in March. I would not have been able to carry on with this raglan seamed top at all ten years ago. I was making up the design as I went along and got stuck on the underarm shaping. It was Elizabeth Zimmermann's Wishbone sweater project (Hurry Up/Last Minute sweater) that put me back on track: I just had to cast on three inches worth of stitches for the bit under the arms, and off I went! It meant no further problem or delay and I could finish this top in a few weeks.

I love to learn new things and knitting (or any kind of craft) is very rewarding when you want to discover and try out new things: there is so much to learn! And you can keep going as much or as little as you like. Elizabeth Zimmermann's writing encourages me to try things I don't know how to do yet. I feel encouraged to try my hand at designing more items, and to look out for techniques I hadn't even heard of a few months back. I am very likely to buy another one or two of her books and will definitely be looking out for further patterns by her.

Fridica blogged about a little dress which came out extremely gorgeous! This also an Elizabeth Zimmermann pattern (the February baby sweater project from the Almanac!).

Tuesday 27 April 2010

Knitting & Crochet Blog Week - Tuesday: An Inspirational Pattern


I love the story behind The Green Sweater by Elizabeth Zimmermann. Jared Flood took photos of the original cardigan that are amazing.  The story about how this garment was rediscovered is lovely and it really made me look very closely at all available photographs.


I love this pattern because the cardigan unites so many different techniques: a turned hem leaving a ridgeline at the hem (and neckline!), mitered corners at bottom/centre opening, steeking of not just the centre front but for both sleeves as well and the neckline! It has very deep dolman sleeves, some lovely decreases at the underarm shaping, a square neckline with again mitered corners - and the very best thing of all: gauntlet cuffs! I LOVE those!

My enthusiasm literally fired up and I went to see if there was more information about this garment anywhere on the Internet. Imagine my delight when I realised that Schoolhouse Press is selling the pattern! It wasn't cheap to get because they send you a hard copy (they do not offer any downloads right now and I am not sure if this may change in the future) and the postage of even a few sheets of paper was more than I was expecting. But I had to have the pattern, there was no two ways about it! I was all afire and I am extremely pleased that I managed to get this at all.

I remember my intense excitement when the envelope arrived! It was wonderful to discover this pattern in all its glorious details.  I had some problem deciding on a suitable yarn. Initially I thought that I was going to do a practice run with inexpensive cotton first, but then I realised that the Pima cotton I had in mind was unsuitable (too stiff so wouldn't drape well) and used Mirasol Qina instead. I love the rose colour but the yarn turned out slightly on the heavy side for this design.


I may make this again and would then chose something like Berocco Ultra Alpaca Fine instead - there is a very gorgeous Boysenberry Mix colour (shade 1282) that I have my eye on! Or another Berocco weight: Ultra Alpaca Light, a DK, in turqoise or Oceanic Mix! Gorgeous!!

I am amazed that the steeking was not as much of a challenge as I feared. All the other details are easy to follow as well and I really enjoyed making this. Getting to the last stage (I only have to knit the neckband now and sew in ends) I am getting rather hampered by the weather having turned so much warmer - it makes you feel less inclined to work with warm wool. But I will finish this cardigan soon and then wear it with enormous pride!

PS: I did sew down the live stitches inside the gauntlet cuffs so there is a little less left to do. Onwards!

Monday 26 April 2010

Knitting & Crochet Blog Week - Monday: Starting Out


It's the start of the Knitting and Crochet Blog Week and here is my first blog entry of the week - on the subject of Starting Out.

Now that's an interesting topic. Unfortunately it is also one that I can't answer. Woe me! I nearly gave up on the idea of taking part in this blog event when I encountered only murky depths in my memory: what happened when I started to knit/crochet, how and why did I start?

It is really odd but I cannot for the life of me remember. Which leaves me wondering if my first hesitant steps into the stitching world were an absolutely horrid experience that left me feeling frustrated and incapable? That would explain why I'm coming up empty...

What I do remember is a misshapen piece of red knitting (must have been garter stitch, that's how we all start, isn't it!) which simultaneously grew (in some places) and withered to ever decreasing dimensions (in other places) - I do remember feeling utterly aghast that his sweaty, knotted piece of wool looping in and out looked quite so pitiful. I am pretty sure that my first effort was utterly awful. Complete rubbish in fact.

I also remember clutching those straight, single point knitting needles (I still hate those with a passion) as if my life depended on it, I'm sure I was in danger of developing finger cramps. I felt hot, bothered and utterly frustrated that this first attempt would not turn into the beginning of an elegant little scarf that I could throw back over my shoulder and casually mention: Oh that thing? I made that myself...

If true to form, that piece of red knotting (can't call it knitting) would have hit the wall and I would have never gone near another piece of animal fibre in string form ever again. Or acrylic, or whatever it was. It must have been quite nasty, I do remember the squeaking of the needles in protest at their shoddy treatment in my hot little paws!

Oh huh! There is quite a bit coming back now!

I can't think what made me carry on. I have the distinct feeling that quite a few of my friends were also picking up needles and hooks - it was one of those things where peer pressure just sweeps you along.

Not sure how long after this, but the next knitting project that I remember is a light yellow (citron!) mohair jumper knitted from one cuff across to the other, in a lace pattern, with baggy sleeves. It just needed sewing along the underarm/side seams to finish off. And I think I did! I seem to remember that I did indeed finish this first major knitting project (I'm so proud!). I think I got lots of kudos from my friends for it too - after they'd all poo-pood the idea as: "Don't do it, don't run before you can walk, it's way too big a project, you'll never finish, it's mohair: it'll be REALLY difficult to knit with, and by gosh: it's LACE KNITTING! Don't do it! Don't do it!!!" - But I did manage, and I did finish, hah!

The only thing I didn't get right was the SSK stitch: I misunderstood the instructions and somehow slipped one stitch over the next before knitting that off - the lace pattern did look rather lopsided if  you looked closely. But that was the only thing that was down to my inexperience, the rest went okay. Astonishingly enough.

I don't know what happened to this sweater - it must have long ago gone to that big resting place in the sky where all happily completed projects eventually go! But it was so much fun to prove everyone wrong! Hah! again.

PS: Unfortunately the KnitCroBlo logos don't show up anymore? (Time of writing: Feb 2013)

Wednesday 21 April 2010

The Knit & Crochet Blog Week - taking part


Knit and crochet blogger Eskimimi had a great idea for an event. Join in and blog about a specific subject (see the list below) each day in the week of Mon 26 April - Sunday 2 May 2010.  There is a wildcard topic if you would like to pick that one day.

It sounds really good fun and I decided to take part.

If you'd like to know more then hop on over to the FAQs - you can also click through to the Ravelry group from there.

There won't be a central list as an estimated 60-100 people have expressed an interest, but use the tagging system and then each blog entry will be googleable (if that's a word. If it is, it's unpronouncable!). Use the following tags:

Day One: knitcroblo1
Day Two: knitcroblo2
Day three: knitcroblo3
Day Four: knitcroblo4
Day Five: knitcroblo5
Day Six: knitcroblo6
Day Seven: knitcroblo7
Wild Card: knitcroblowc

The topics are:
 
Mon 26 April: Starting Out
Tue 27 April: An Inspirational Pattern
Wed 28 April: One Great Knitter
Thu 29 April: A New Skill
Fri 30 April: Location, Location, Location
Sat 1 May: Revisit a past Finished Object
Sun 2 May: What a Yarn

And the wildcard topic: All Tooled Up (in case one of the others doesn't inspire).
Check out Eskimimi's blog for more information about the topics etc.
 
It will be nice to do something as part of a community!


Sunday 18 April 2010

It is spring!

There must be something in the water - if not then it must be because it is finally spring! I am in a positive fever of 'new, new, new!'

In the last three weeks I cast on so many new projects that I it makes me dizzy.  I know that I love to start a new project but have absolutely no discipline in finishing it.  It is a problem but then my Ravelry projects page and this blog help enormously!  When I know that a photo of the finished project will make for a very satisfying new blog post, then I am so much more inclined to get the last 5% done - the bit that's often about sewing up a hem, weaving in ends, attaching a facing: nothing that takes too long but it seems to be the most exhausting thing about the entire enterprise.

I simply had to order some 'really nice yarn' after buying a bit too much in the 'affordable' category that left me unenthused about knitting with it.  My goodies from Colinette arrived last Saturday and I immediately cast on:


1) My Saroyan shawl in Colinette Skye - colourway Fire (lots of reds, some pinks, and lighter shades that aren't quite yellow but almost).  I love this yarn! It is more chunky than I expected because I didn't pay enough attention to the needle size quoted: 4.5 mm though I am using 5 mm needles. That'll teach me!
I must try their Cadenza yarn as well, this is also 100% wool but thinner for 4 mm needles. Next time.


2) A tank type top in Debbie Bliss Prima, in a very bright blueish green. I adore the intensity and brightness of this colour! In fact I'd been looking at this on three seperate occasions when I popped into John Lewis, and then I finally had to buy four balls.  I hesitated because I did not want to knit a chunky weight fabric and this yarn is a little thicker than I would like. So being somewhat crazy and totally loopy I put my yarn swift to good use: the yarn is 6 ply and splits quite easily into two halves of three strands each.  The yarn swift goes round easily enough to pick up its half but the hanging thread starts to twist very quickly and makes further splitting and winding impossible. So I  wound the yarn onto a roll of newspaper first and then used a technique from lace tatting to untwist it: I turned the yarn coming from the newspaper roll into a loop, twisted that round once or twice and slipped this loop over the end of the roll. Pull the thread tight and the newspaper roll can hang from your hand to spin round and untwist itself.

I've had evenings of fun with this: being stood there in quite a contemplative and somewhat medidative trance while listening to the telly. It worked really well!
I cast on for a slightly fitted sleeveless summer top and have gotten to almost the armhole shaping.  I am not following a pattern but making it up as I go along. I rather enjoy that. I am looking forward to finding out how this will shape up out in the end.


3) The Balmoral 'Thistle' doily design from Marianne Kinzel's Second Book of Modern Lace Knitting. Don't be fooled by the use of the word 'modern' in the book title, this series was modern at some point but rather long ago. I do like a lot of the designs and the books are not too expensive so I managed to get both of them.  The Thistle doily from the cover looks too intriguing so I just had to cast this on as well.

I managed to snap up some Knitwitches silk at I Knit when the knitting group met in the nearby Camel and Artichoke pub. This was around the time when I put the Colinette order in - I felt in dire need of some yummy yarns so I indulged!  Getting it home and winding it from skein into ball pretty much straight away of course meant that I kept looking at it while various wild ideas ran around my head when I tried to decide what it was going to be. Seeing as I was preoccupied with both the yarn and the design, I finally decided to put them together. The aqua/turquoise and grey is quite suited to a thistle design (the colourway is called Lucerne).
The only problem is that while knitting the yarn dye comes off onto my fingers a bit. I'll take that into account when it comes to blocking this.


4) I swatched my new Colinette Jitterbug in colourway Cherry but find that I cannot use it to knit the project that I intended with this.  I saw these very gorgeous socks on Ignorant Bliss's blog and just had to hunt down the pattern from Yarnissima (available via Three Irish Girls), they are called The Portland Gussets.  Aren't they absolutely gorgeous? I think that this has a kind of Art Deco feel to it: very elegant clean-cut lines, deceptively simple - totally up my street!
They are to be knit at 34 stitches to 10cm or the pattern won't work. Most of the time I am inclined to adapt all sorts of things to my liking (see splitting the Prima yarn as above) but I don't think that messing around with this very lovely pattern would make for smooth sailing or even a hint of promise at success. I'd just end up ripping it all down again. I might be loopy but I'm not that silly. I knit this yarn at 26 stitches and those eight stitches are too much of a difference: I won't be able to get gauge with thinner needles. I would have to increase my tension and that's not going to happen.

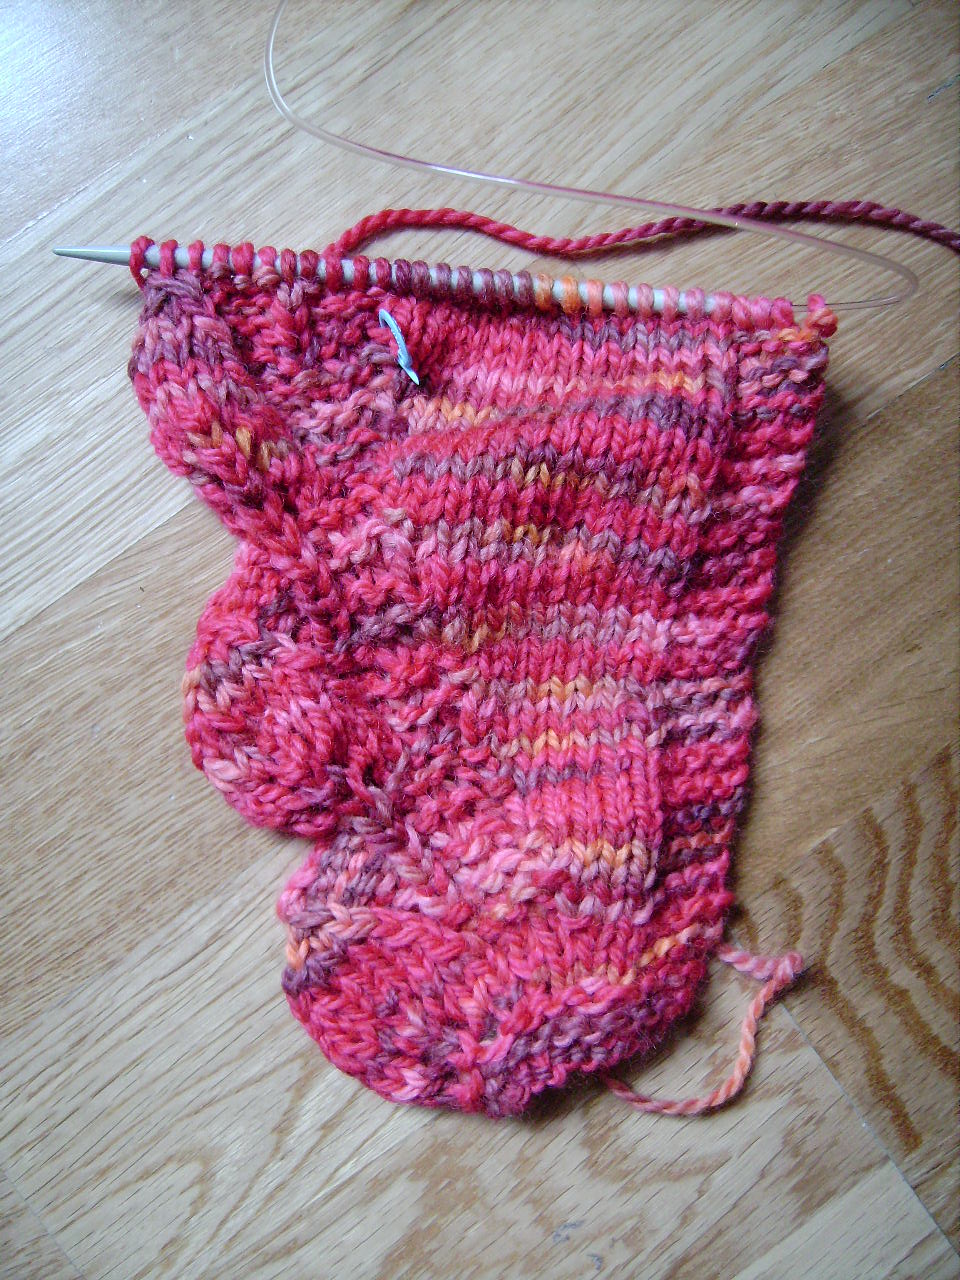
Still in the mood for yummy Cherry socks, my next idea for this yarn lovely yarn is the Riverbed Master pattern by Cat Bordhi from her book New Pathways in Sock Knitting - Book One.  The link to the pattern is again to Ignorant Bliss's blog entry that I was delighted to see because I already have the book at home. I bought Cat Bordhi's book after seeing the Master Coriolis socks on a blog. I haven't started yet because I am finding it tricky to follow the book - the instructions for each sock design are build on concepts and techniques listed elsewhere in the book, necessitating a lot of leafing backward and forward to copious amounts of post-it notes to mark the pages. Not something you can quickly dip into and start knitting! I will have to set aside a quiet day for immersing myself into the ideas in the book, then I might have a chance to slowly get to grips with it all.
I should have started on a dead simple flap heel sock in stockinette stitch, that would have been so much more sensible! But I can't help myself: I really like how these look!


5) Crikey, nearly forgot this one:  a bright pink summer top in 100% cotton 4 ply by Patons. Knitting with cotton isn't everyone's cup of tea but I quite enjoy it as a change to other yarns. Its inelasticity means that it snakes round the needles like little knubbly ropes and you can feel each stitch very easily even in bad light. The yarn won't be too splitty either which is its best quality in my opinion. Unfortunately cotton does not block at all well - whatever shape the item is in when you finished knitting is the shape it will stay in. No amount of ironing or steaming will change this, believe me, I've tried.

I found a lovely lace pattern in a German knitting magazine called Katja which I must have bought in 2000. Being a bit of a hoarder can have its advantages, occasionally. There are about four tops that I would love to knit. This one which was also shown in a bright fuchsia (to go with the spelling on Wikipedia) which is what first caught my eye - it is my favourite colour. I love the lace pattern: not too repetitive, not too lacy and with a nice organic feel to the shapes. I am heavily modifying the instructions (the top is named: 'open lace work top' [Offener Lochmusterpulli], nothing more descriptive I'm afraid) because I want a slightly fitted shape as opposed to the looser fit in the magazine. I am also planning on making this sleeveless for summer wear. And if not sleeveless then perhaps small cap sleeves by extending the lace pattern panels that run up along either side of the centre stitch. The original shows those panels as edging past the top of the arm, intruding into sleeve cap territory.


So there you go: all my new projects that may or may not get made in the next few months. I love picking up whichever project grabs my attention and running with it until another one nudges it out of its top place. Some times I change back and forth between two projects - whenever I get a bit fed up with one, the other one wants picking up. Love it when that happens.

I still need to finish my rose coloured EZ cardigan (the pattern is actually called 'The Green Sweater', see the Internet e.g. Jared Flood's blog, Schoolhouse Press website and Ravelry). If you would like to read the story behind The Green Sweater: here's the link.

What project did you last cast on? Put a link into the comments if you like.

Steek update

Carrying on from my earlier blog entry about steeking the Elizabeth Zimmermann cardigan, here are a couple of photos of the steeks I didn't show before.

This is the steek of the right sleeve (on the right as worn).  I had sewn along the centre of the six steek stitches with my sewing machine, i.e. on top of steek stitch number three and stitch number four.  I am not sure how easy this is to see in the photo,  The loose threads at the bottom may be the most visible bit.


Again, I put in four sewn lines keeping the line to be cut in the centre - these are about half a knitted stitch's width apart.  The knitting needle sits at shoulder height, the bottom of the photo shows the cast on steek stitches - these will get folded inside and sewn down by hand and become facings.

Cutting the garment open between the middle two sewn lines:


I then grafted the shoulder stitches closed and began to pick up stitches for the dolman sleeves from a column of knitted stitched three stitches in, i.e. not inside the area of the steek stitches but the last 'proper' stitch either side (the three steek stitches need to remain as they are so they can be folded inwards).  I then knitted these picked up stitches off together with the live stitches kept on waste yarn at the bottom of the armhole to make the second sleeve.

I also machine sewed the four stitch lines down the centre of the cardigan for the front opening but I haven't cut this open yet.  I still have to knit the neck facing but will have to cut the front opening first to ensure I pick up stitches in the correct place and also so that the neck band will look okay.

Thursday 8 April 2010

My first steeks!

I am terribly excited: I started an Elizabeth Zimmermann cardigan using steeking for the sleeves, front parting and the neckline.  These are my first steeks!

This picture shows the cardigan with the neck steek sewn down and cut and also the left sleeve steek (from the perspective of the person wearing it). I hadn't sewn the other two steeks yet but I had picked up the sleeve stitches and knitted the couple of inches you can see in the photo.


If you haven't come across the technique before: steeking is a way of knitting a garment in the round, even across 'openings' like the armholes, centre parting or the neckline (you cast on a number of so called 'steek stitches' which will later form facings on either side of the cut to be turned inwards and sewn down) and then fixing the column of stitches with a sewn line to prevent the edges fraying, - then you cut the garment open between the sewn stitch lines.  It sounds quite scary, doesn't it!

There are two methods of stopping the thread ends fraying: you can crochet across a column of stitches - this is good with wool which will "stick" together but not at all satisfactory for any other yarn which will slip out from underneath crocheted loops. The other method is to use a sewing machine: reduce the stitch length a bit, then sew in a straight line up or down a row of steek stitches on either side of the line which is to be cut, about half a stitch's width from the cutting line.  It's a good idea to pick a colour that's not too much of a contrast to your yarn but it doesn't have to match a hundred percent either - these machine sewn stitching lines will be on the inside of the garment.

I chose to sew four lines in place of just two: the garment will be cut between the centre two lines.  Should the thread ends slip past the first, the second line of defence will definitely catch them!  I think that's a really good idea: the second stitching line does not show up in the finished garment and it provides a lot of peace of mind no matter how much wear the garment will get during its lifetime!

I was wary that machine stitching might distort my knitted fabric - it didn't.  I guess the trick is to allow the sewing machine to feed the fabric through by itself and not be tempted to start pulling or pushing.

Then it came time to make the first cut into my beautiful knitted cardie!  I thought I'd be more nervous, but I just wanted to get this done so I could start knitting the first sleeve!

My tip would be to only cut when you are able to fully concentrate on the task at hand.  I got distracted at some point and found that I had cut across my first sewn line!  Couldn't believe I'd done that.  Only for a little bit, but still.  That second sewn line I'd decided to put in came into its own there!  Good thing.

There is a disadvantage to steeking: your garment won't look anything like the finished article before you cut the steeks and that means that you can't try it on as you make it.  Holding the garment flat against you to check for size only works when you remember that you need to discount the steek stitches: the width of those will be become the two facings that get turned inside and sewn down, i.e. either side of the cut.

Norwegian jumpers and garments with a lot of colourwork or Fair Isle patterns are often steeked - for example if you wish to insert a zipper at the neck opening.  When knitting garments with lots of colours then using steeking means that you are able to knit the whole thing in the round: no purling involved!  It does make knitting a lot easier when you can see what you are doing on the right, stockinette side without getting confused by the strands of yarn carried on the purl side.

PS: I just thought of another advantage to using steeks: in three places my tension had been too loose - the stitches very much showed up for being way too big*.  The photograph still shows one of those lines (about two inches below the neck opening) and also two loops where I pulled the stitches into the right size while gradually transferring the excess to the centre of the garment.  I did the same to the loose row - then when I machine sewed the four lines down the centre, I made sure to leave the loops between the two middle lines.  When it gets time to cut the centre open I will be able to cut the excess thread off and no-one will ever know that my tension wasn't perfect in those three places!  I'm rather chuffed with my repair work here.

* Note: I just found a very insightful article by TechKnitting on the cause of uneven knitting: referred to here as 'rowing out'. I may have simply let my tension get much looser than at other times. If the loose stitches occur across just a few stitches then this may be due to taking too long to move your hands along while knitting off too many stitches. This is the most likely cause for these loose rows of stitches that show up way too clearly in the photo above. I can only recommend TechKnitting's blog - if you want to know why something works then this blog is wonderful. If you run into a problem that no amount of wondering and pondering can sort out, then checking this blog might just provide the answer and cause a positive leap forward in your progress as a knitter, if I can put it that way.
This is one of the things I like about knitting: there is always something new to learn no matter how much you know already. And picking up new tidbits of knowledge has got to be a very satisfying thing indeed.